The building code is not for you--it's for your community

As a cabinetmaker and installer I regularly run into a few building codes that people don’t want to follow, and I’m the last line of defense. Don’t ask a tradesperson to violate the building code. It’s trashy, first of all, but it’s also indicative of an overall adversarial relationship with society as a whole. Here’s one for example.

Q: “Why won’t you just cover my outlet?”

A: Because it has to be accessible. I cut it into my cabinetry and pull the box into the carcass with a spark ring if possible, or I have an electrician pull it into a box in the cabinet. I won’t just cover it for a few reasons:

  1. outlets fail and can cause a fire in the future.

  2. Something can work itself loose and it will leave one of my fellow tradespeople looking for the open circuit with the actual problem covered up.

  3. It’s against the law and you should be ashamed of yourself for asking.

Q: “But we didn’t pull any permits on this job or they’re already closed out.” wink

A: You’re really missing the point here. The code isn’t for you, it’s for:

  1. Firefighters to know that they’re entering a safe building.

  2. Future homeowners shouldn’t have to disassemble the building to know that it was built in accordance with accepted minimum guidelines.

  3. Future tradespeople should be able to troubleshoot, upgrade, and retrofit systems without having to work backwards first.

  4. Your neighbors who don’t deserve to have their house burn down because you don’t respect the building code.

  5. Children and guests who visit your home who are either not able to consent to enduring your poor judgement or not aware that they shouldn’t assume your house conforms to minimum requirements of habitability.

  6. The code protects me! There is no insurance or contract clause that will shield me from liability in the event of negligence. I know better (not that it changes anything if I don’t) so I do better. I’m here to protect you from your ignorance.

What Drives the High Cost of Pocket Door Installation in Remodels?

Pocket doors can be expensive to install in existing construction for a few reasons:

  1. Structural changes: Installing a pocket door requires altering the existing wall structure to accommodate the door pocket, which can involve significant changes to the framing, electrical, and plumbing systems. This can be a time-consuming and labor-intensive process, which can drive up the installation costs.

  2. Customization: Pocket doors are often custom-made to fit the specific dimensions of the opening, and this customization can add to the overall cost of the door. Additionally, the hardware required to operate the door may also need to be customized to fit the space, which can also add to the cost. There are some great premium kits on the market, but anything off-the-shelf needs to work with standard sizes.

  3. Skilled labor: Installing a pocket door requires specialized skills and tools that not all contractors may possess. Contractors who specialize in installing pocket doors may charge higher rates for their services, which can contribute to the overall expense of the installation.

  4. Wall finish: Installing a pocket door often requires removing and replacing the wall finish, such as drywall or plaster, which can add to the overall cost of the installation.

  5. Surface Protection and Isolation: working in an occupied space in particular comes with its own set of challenges. Since pocket doors are most commonly installed in smaller homes, even having room to work on the project can be a challenge. Removing drywall is one of the messiest processes in demolition and this is always a part of the pocket door retrofit process.

Overall, the cost of installing a pocket door in existing construction will depend on the specific circumstances of the project, including the complexity of the installation, the materials used, and the level of customization required. It is always recommended to consult with a qualified contractor to obtain an accurate estimate for the installation of a pocket door in an existing wall.

6 Tips for Making Your Mudroom More Functional

Mudrooms are often an overlooked area of the home, but they can be incredibly functional and useful spaces. Here are some tips for making mudrooms more functional and easy to use:

  1. Maximize storage: Mudrooms are all about functionality and storage. Consider installing built-in cabinets, shelving, or cubbies for shoes, jackets, and other outdoor gear. Hooks or pegs on the wall can also provide additional storage options.

  2. Include a bench or seating area: Having a comfortable place to sit while putting on shoes or taking them off can make the mudroom more functional and enjoyable to use. A bench with storage underneath can also provide an extra place to store items.

  3. Choose durable materials: Mudrooms can get messy and dirty quickly, so it's important to choose materials that are easy to clean and durable. Consider using tile, vinyl, or concrete flooring, which can withstand heavy foot traffic and be easily cleaned.

  4. Add lighting: Adequate lighting is essential in a mudroom, especially if it doesn't have any windows. Consider installing overhead lighting or adding lamps to brighten up the space.

  5. Use color to your advantage: Mudrooms can be drab and uninspiring, so consider adding color to make the space more inviting. A bright coat of paint on the walls or colorful accessories can liven up the space and make it more welcoming.

  6. Make it multi-functional: Depending on the size of your mudroom, consider making it a multi-functional space. You could include a laundry area, a pet washing station, or even a home office.

By following these tips, you can make your mudroom a more functional and enjoyable space that adds value to your home.

What does AI mean for the cabinet industry?

The internet is abuzz with discussions about newly-released innovations in Artificial Intelligence (AI) and the implications it could have for workers and industry. I haven’t seen anyone discussing these trends in the cabinet industry specifically yet, but don’t worry! The cabinet industry won’t be left unscathed by these innovative new technologies. Here are few observations and predictions:

Design Powered By AI

I used an AI program called StarryAI to design a few mudroom cabinet elevations using minimal prompting. I didn’t include any dimensions for instance, or any guidance on layout, but wanted to see what the program could put together for basic “inspiration” images comparable to renderings you’d see in a preliminary design packed. There are quirks. There are artifacts and aberrations. Overall though? They’re pretty good.

Most clients would never notice these inconsistencies. And compared with the time required to produce their traditional equivalents, they were a bargain. I see the interior design field transforming dramatically in the next five years. The first company to market with a full-stack AI-enabled CAD/CAM package for the cabinet industry wins.

Other Areas

I suspect a lot of customer service will be handed over to AI soon; much of it already has! E-mail, texting, some calls, and online chat are all great places to plug AI into your workflow. These tools could generate blog content, web site descriptions, parse contact form entries, answer frequently-asked questions with a bit of training, and eventually even weigh in on upcoming business trends.

Final Thoughts

Hands-on work by skilled artisans isn’t going anywhere. We already use CNC machinery, CAD, and other CAM solutions right now to get our work done. Installing will always be done by humans more than likely.

Now are these changes going to be net positives or negatives? That remains to be determined. Largely that’s going to depend on how our business community and government leaders decide to adapt to the changing nature of work. Based on how we’ve managed climate change, the housing crisis, industrialization, and globalization I’m not very optimistic, but I would love to be wrong!

New Baseboard in an Older House: A few things to consider

When it’s time to upgrade the baseboard trim in your historic home, there are a few things that often come up that aren’t generally an issue in newer construction. Here are few things that I always like to check:

  • Plan for Plaster Damage.

    • While we always try our best to avoid damaging plaster walls, it’s somewhat inevitable in an older home that something will be damaged when baseboards are removed. There are things that can be done to minimize damage such as using a “trim puller” pry bar and using a wide board behind your pry bar to pull against, but some amount of spalling and cracking is inevitable so plan accordingly!

  • Have you floors been refinished? There will be a ridge.

    • If your floors have ever been sanded down with the base trim in place, there will be a ridge around the perimeter of the room where the baseboard sat. It may even extend under a shoe moulding if it wasn’t removed (it should always be removed prior to refinishing FYI). This may mean additional labor or make shoe moulding a requirement.

  • Your base trim is likely two pieces!

    • What looks like a single tall baseboard is often just a cap over a more generic base with a tapered top profile. What I often suggest to homeowners is if their base cap is custom, have that custom made and use a stock baseboard that’s “close” even if not an exact match. This doesn’t really draw the eye and saves a lot on knife grinding charges which are generally billed by the inch (around $50 an inch is standard).

  • Baseboard Outlets.

    • A lot of older homes have single gang outlets mounted sideways in the baseboards. Sometimes these have been upgraded to modern romex cable, but often I find original knob and tube or cloth-wrapped wire in these boxes. It’s wise to upgrade at this time, both your wire type and to a modern grounded receptacle. If you don’t have baseboard outlets, now would be a great time to add them! Avoid the expense of trenching through your plaster in the future.

  • Heat registers and return air.

    • If you have baseboard-mounted heat registers, now could be the time to upgrade them. You can often get by with a smaller register that will integrate better with your baseboard. If you want to add registers to your home, this is also the time to do it. Many old furnaces required substantially more return air than modern systems too, so you may be able to eliminate some return air vents or at least down-size them. If you have drop-in floor grates, you can have you carpenter build and install flush wooden floor registers that can be sanded and refinished along with you floors.

  • Planning to make any changes to your doors or door trim? Now is the time.

    • Baseboard runs into your door casing, so these should really be done first to avoid any re-work.

  • Reuse what you can!

    • Many old baseboards can be reused. Drive the nails out through the face of the board to save as much as you can. They may look a little rough with chipped paint and such, but you’d be surprised what a fresh coat of paint can do. Even badly cupped boards can be used if you keep cuts sequential, meaning if you cut outside miters from the same board, one beside the other, the cups will actually match up. Inside corners need to be coped anyhow, so a skilled carpenter can simply scribe the cup into the cope.

Anyhow, I hope this helps.

As always, we take pride in helping our community to maintain its cultural heritage.

Reach out with any questions and I’ll do my best to help.

—Nate Cougill, owner

New Shop Space!

Big things are happening over here, and I’m extremely grateful to all of you who helped make this possible. We’ve quadrupled our workshop space this month and are set up to finally bring all of our manufacturing operations off-site and in-house. What does this mean for our clients?

  • Shop-building as much of our work as possible to decrease the time we spend on-site in our customers’ homes.

  • Increased capacity to take on larger projects. We can now build (and store) much larger projects that we could previously. Now we’re equipped to take on things like an entire kitchen for instance.

  • Expanded milling capabilities. We have a moulder that is capable of cutting profiled trim up to 7” wide, both straight and curved parts. While it’s not a machine suitable for high volume milling, it’s more than adequate for milling entire houses worth of trim. This will be especially helpful for our historic home clients.

  • More veneering capabilities. We are starting to offer more veneer work using vacuum bag clamping. We are shop sawing thick hardwood veneers on our resawing bandsaw as well as laying up commercial veneers where applicable. For our clients this means better grain-matching, higher quality veneered faces, thick veneer countertops in species where solid isn’t cost-effective (white oak, walnut, exotics), and potentially taking on exterior entry doors using stave core construction.

Check out this wainscoting paneling we built in the shop and delivered in 4 parts! 2 days on-site counting finishing and installation.:

"An' it harm none, do as ye wilt": Our promise of tolerance, love, and mutual respect

To our customers, in the spirit of tolerance:

The construction industry has a bit of a reputation for bigotry and what can I say other than the construction industry has earned it. And then some. This is just to say that we operate under the ethos of Live & Let Live. There is no place for intolerance on our projects or in our communities. I don’t care if you’re a master at your trade. I don’t care if you’re our biggest supplier. I don’t care if you’re our largest contract in our company’s history. Get on board or get lost.

We create interior woodwork for our clients’ homes that supports their chosen lifestyles and pursuits, whatever those may be. We work for all types of people, from deeply religious families of 12 to atheist retirees, from Latinx lesbians to newlyweds in their starter home. I’ve hung church doors, built puritan-style pulpits and pews, king size beds with a suspicious number of lashing points, and installed all the cabinetry for a dispensary or 3. I’ve built the offices of a real estate developer and a coat closet for an urban farmer. I’ve built indoor stalls for a dog training kennel and reproduction balusters for a 19th century mansion.

In short, we love this city and are proud to serve our clients and our community, whatever that looks like. We support your lifestyle whether it’s like ours or different or even hostile to our own. And while we’re guests in your home, we’ll respect your home, your views, and your boundaries.

Sincerely,

Nate Cougill, owner.

Accent Walls: 4 Great Options for Distinctive Walls

Looking to add some texture and style to your drab white walls? Sometimes an accent is the perfect solution. We offer several products we think you’ll love, ranging from contemporary to traditional.

3-D Panel Options


Fretwork Panels

These unique panel products from Ekena Millwork add visual interest and texture to any room.

These decorative panels are new to the market and we’re the first company in Denver to offer them. Our Fretwork Panels are laser cut from 1/4” materials in a variety of finishes that can then be applied directly over drywall with minimal prep work. Paint to match or stain a natural wood panel for a unique style. Most profiles can be ordered in several different sizes, and there are literally hundreds of options to choose from! Check out all the product offerings at our vendor’s web site

Abstract Molded Panels

These abstract 3-D Textured panels add some sleek contemporary styling!

Made of a durable plastic, they can be used indoors our outdoors, in residential or commercial buildings.

Available in hundreds of options!

Vendor Catalogue


Shiplap & Plank Options

Some would say it’s been overdone, but it’s no passing fad if you ask me. There are enough varieties of wooden shiplap and tongue and groove products to keep things interesting. We offer 2 main collections: Dakota Rustic and WindsorOne:


The Dakota Rustic line of products is a pre-finished, weathered and distressed wooden plank product.

This collection was once a conceptual dream for two salesmen at Forrest Products Distributors in Rapid City, SD located in the beautiful Black Hills. Cody and Todd were looking for a product to take to market that would meet the needs of today’s growing popularity of building accent walls, rustic furniture and crafts. Countless hours were spent with the design and development stage to bring the product alive. They offer 9 different finishes.


WindsorOne offers two main varieties of wall cladding, Tongue and Groove and Shiplap.

These products come pre-primed and both have two textures to choose from on each plank. T&G has a beaded side and a smooth side (see below). Shiplap has a smooth side and a rough side. All of these products are indoor/outdoor, and all are a stabilized pine product with finger joint composition (no knots or defects allowed).

Check out their product offerings here or see them in action at our Custom Laundry Room build

WindsorOne Tongue and Groove collection, beaded side and flat side on each size.

Wooden Block Walls

Add some warmth to your contemporary interior. We install these contemporary block mosaic panels that are guaranteed to add some “WOW” factor to your home. This one is in solid walnut and comes pre-finished to keep the mess to a minimum

But all of these products have one secret that sets them apart from the competition….

The best part about all of our accent wall offerings of course is that they’re all Proudly Made in the USA from domestic materials, so you can keep your carbon footprint modest and your decor BOLD.

Bookcase Doors: finer points of designing a hidden door

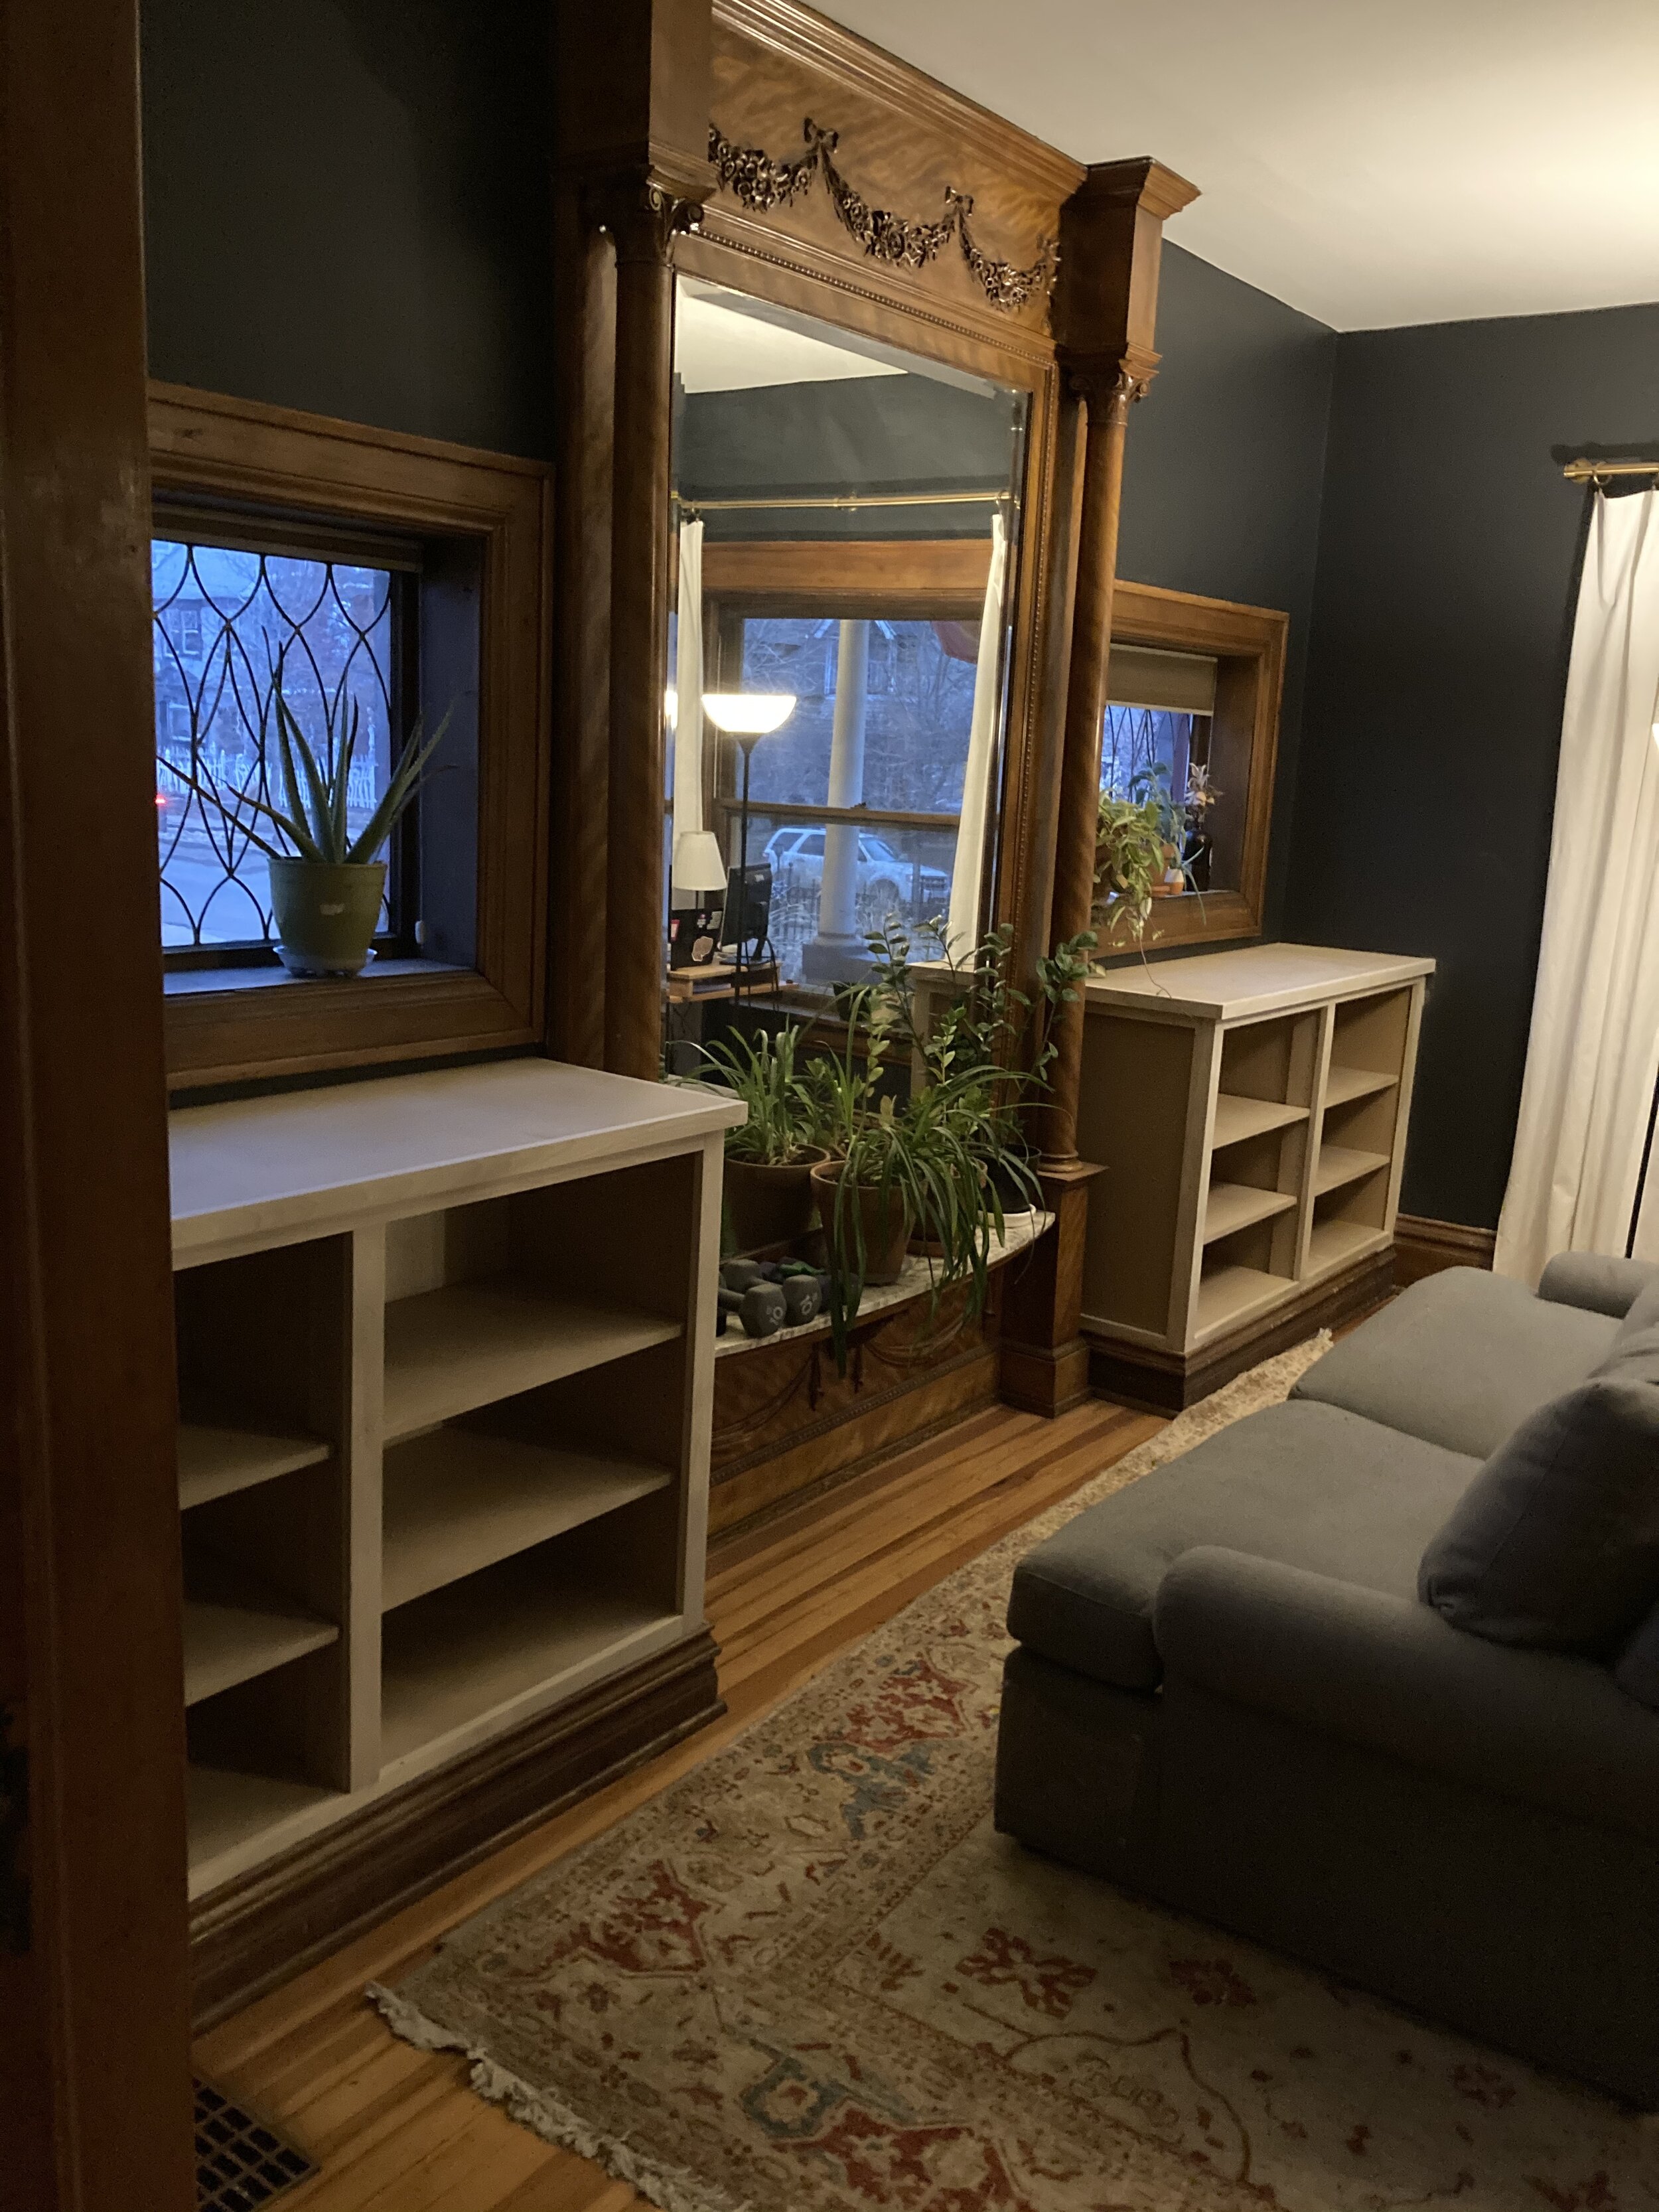
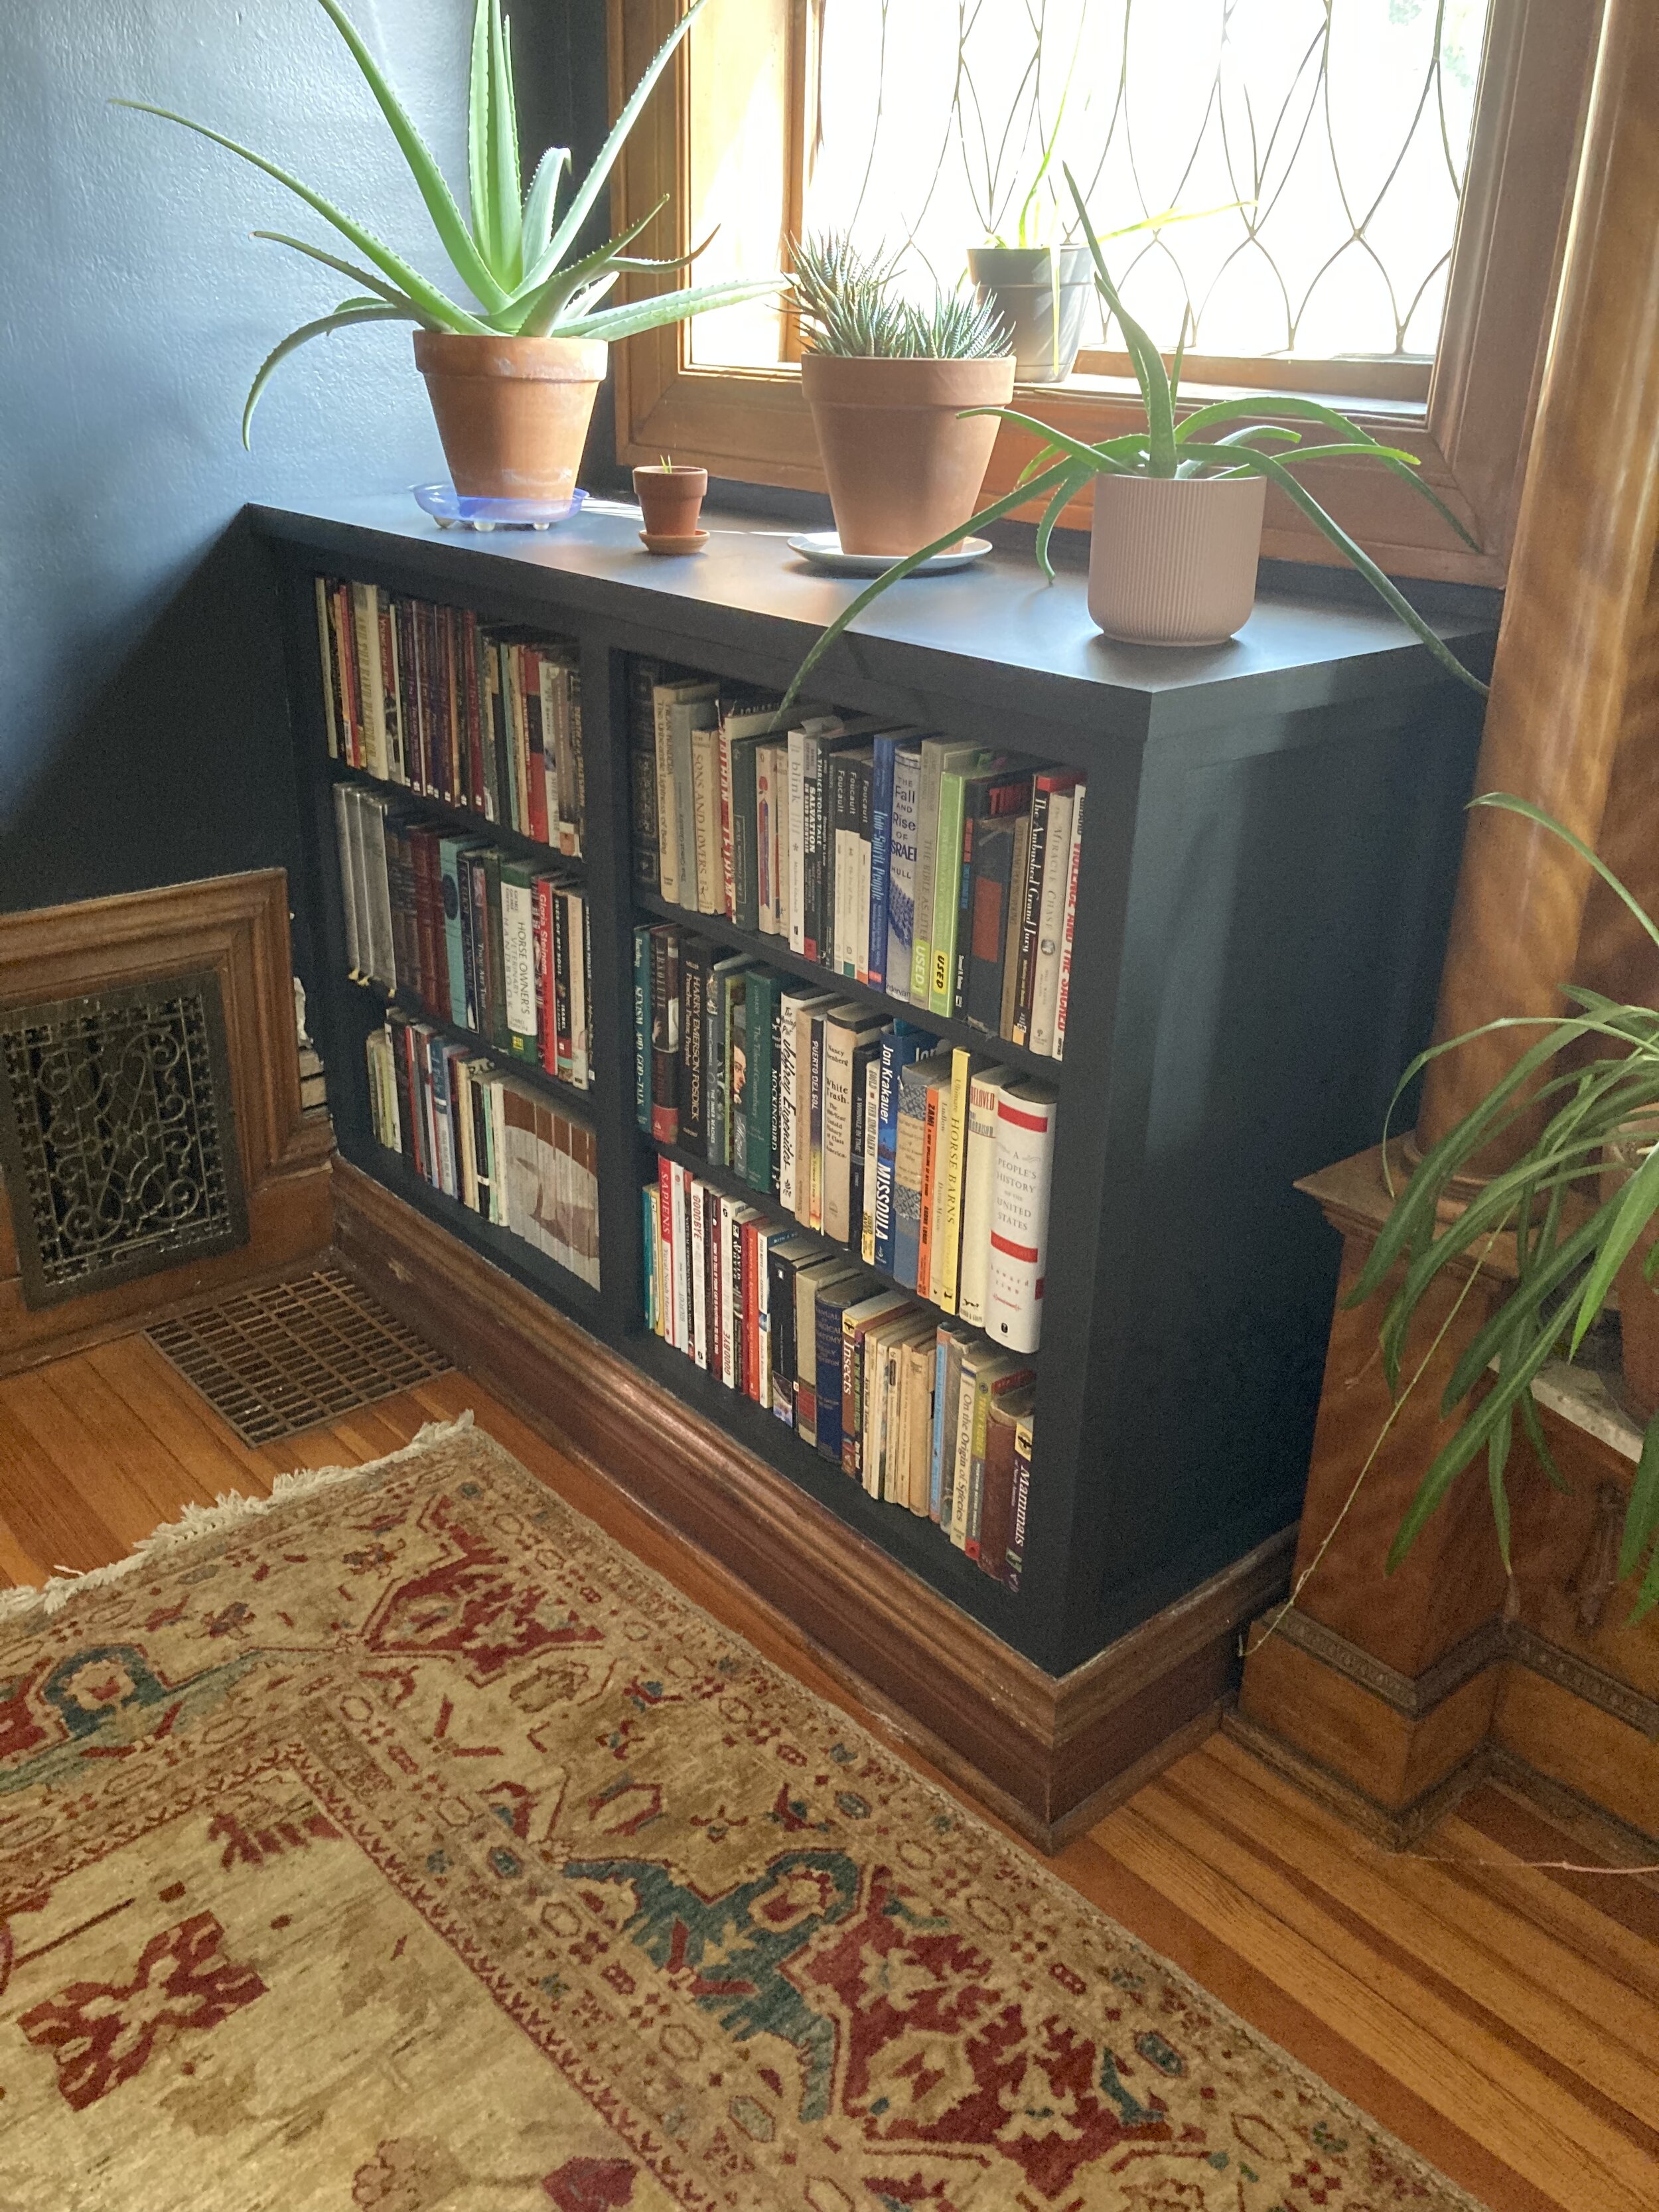
We were approached recently by a client who wanted to add a bookcase door under the enclosed stairway of their 1910’s Tudor Revival cottage. There was a substantial amount of inaccessible space underneath the stair after a closet had been walled off during a previous remodel. The build is still in progress, but I’m going over the finer points of the install here while the details are fresh with the intention of updating this post after drywall repair, paint, and a few other odds and ends after the holiday.

Preparing the Opening

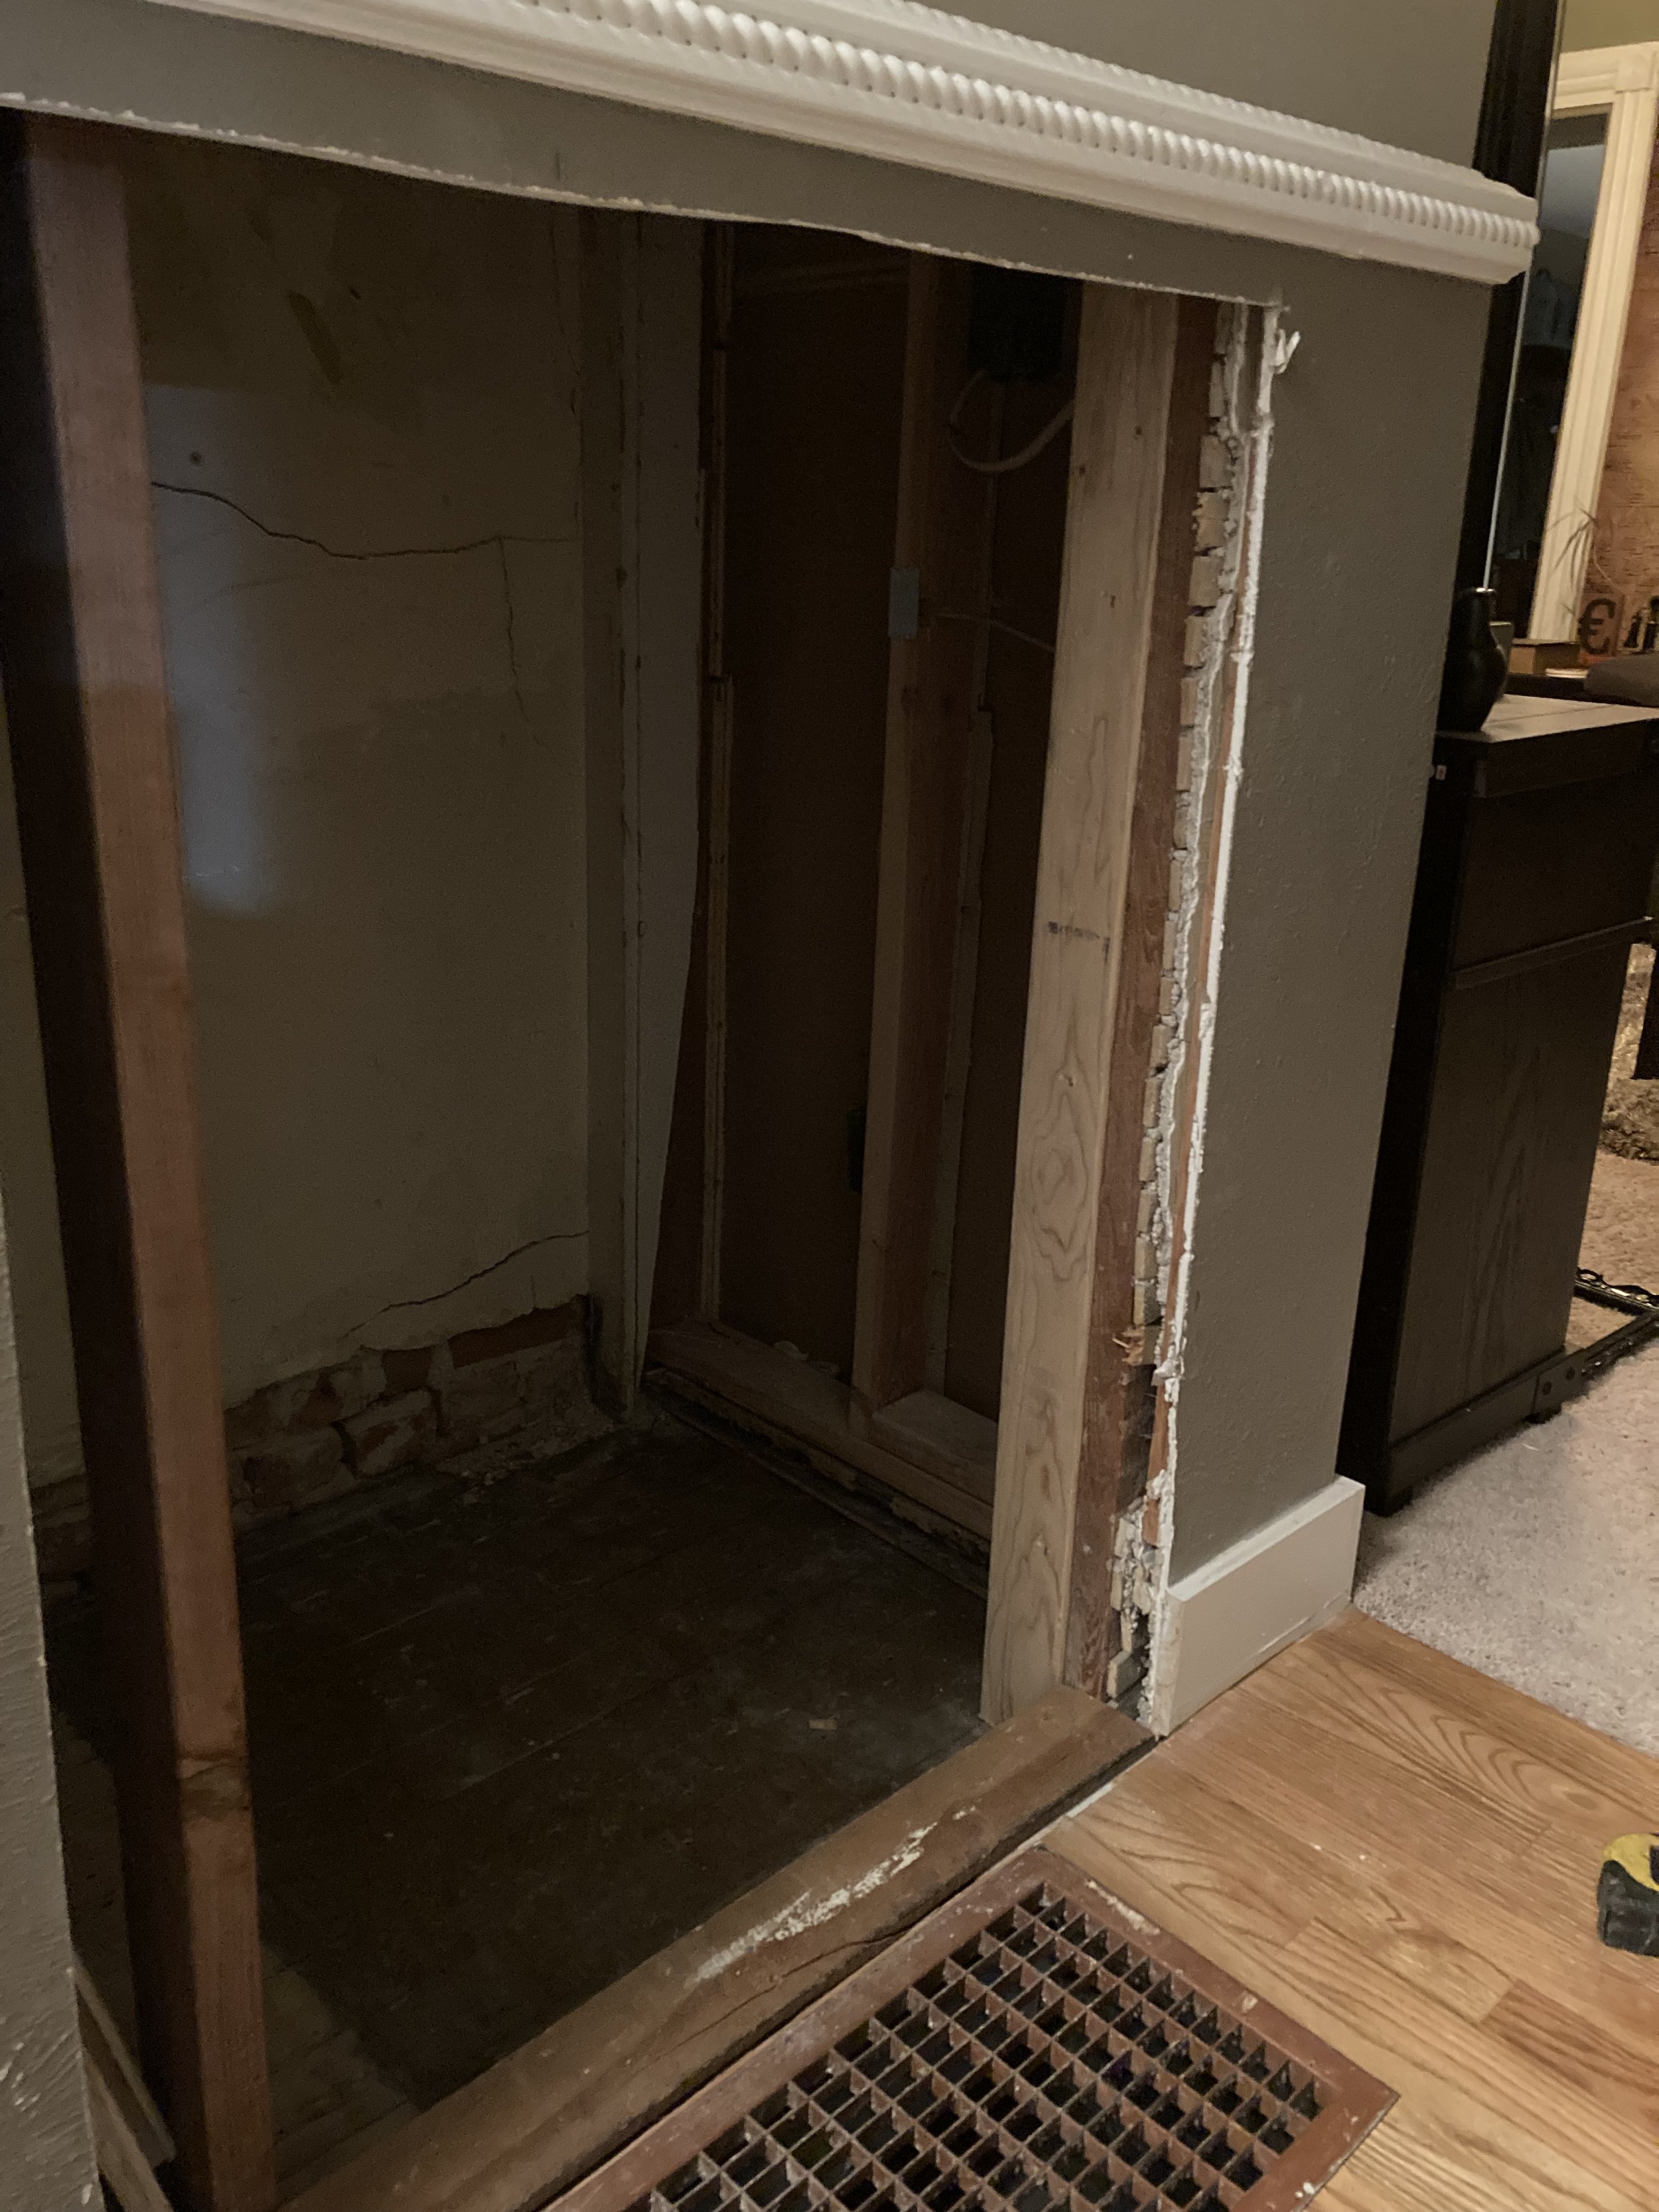
To allow access from the entry wall where the bookcase door was intended to go, we had to do some fairly intensive demolition. There were load-bearing studs underneath the stair that were supporting the mid-stair landing and the subsequent string to the second story. We doubled up the trimmer studs on either side of the opening with new bottom plates with the point load bearing directly over floor joists. A double 2x6 header with a double hanger provided adequate load transfer to remove the studs in the way.

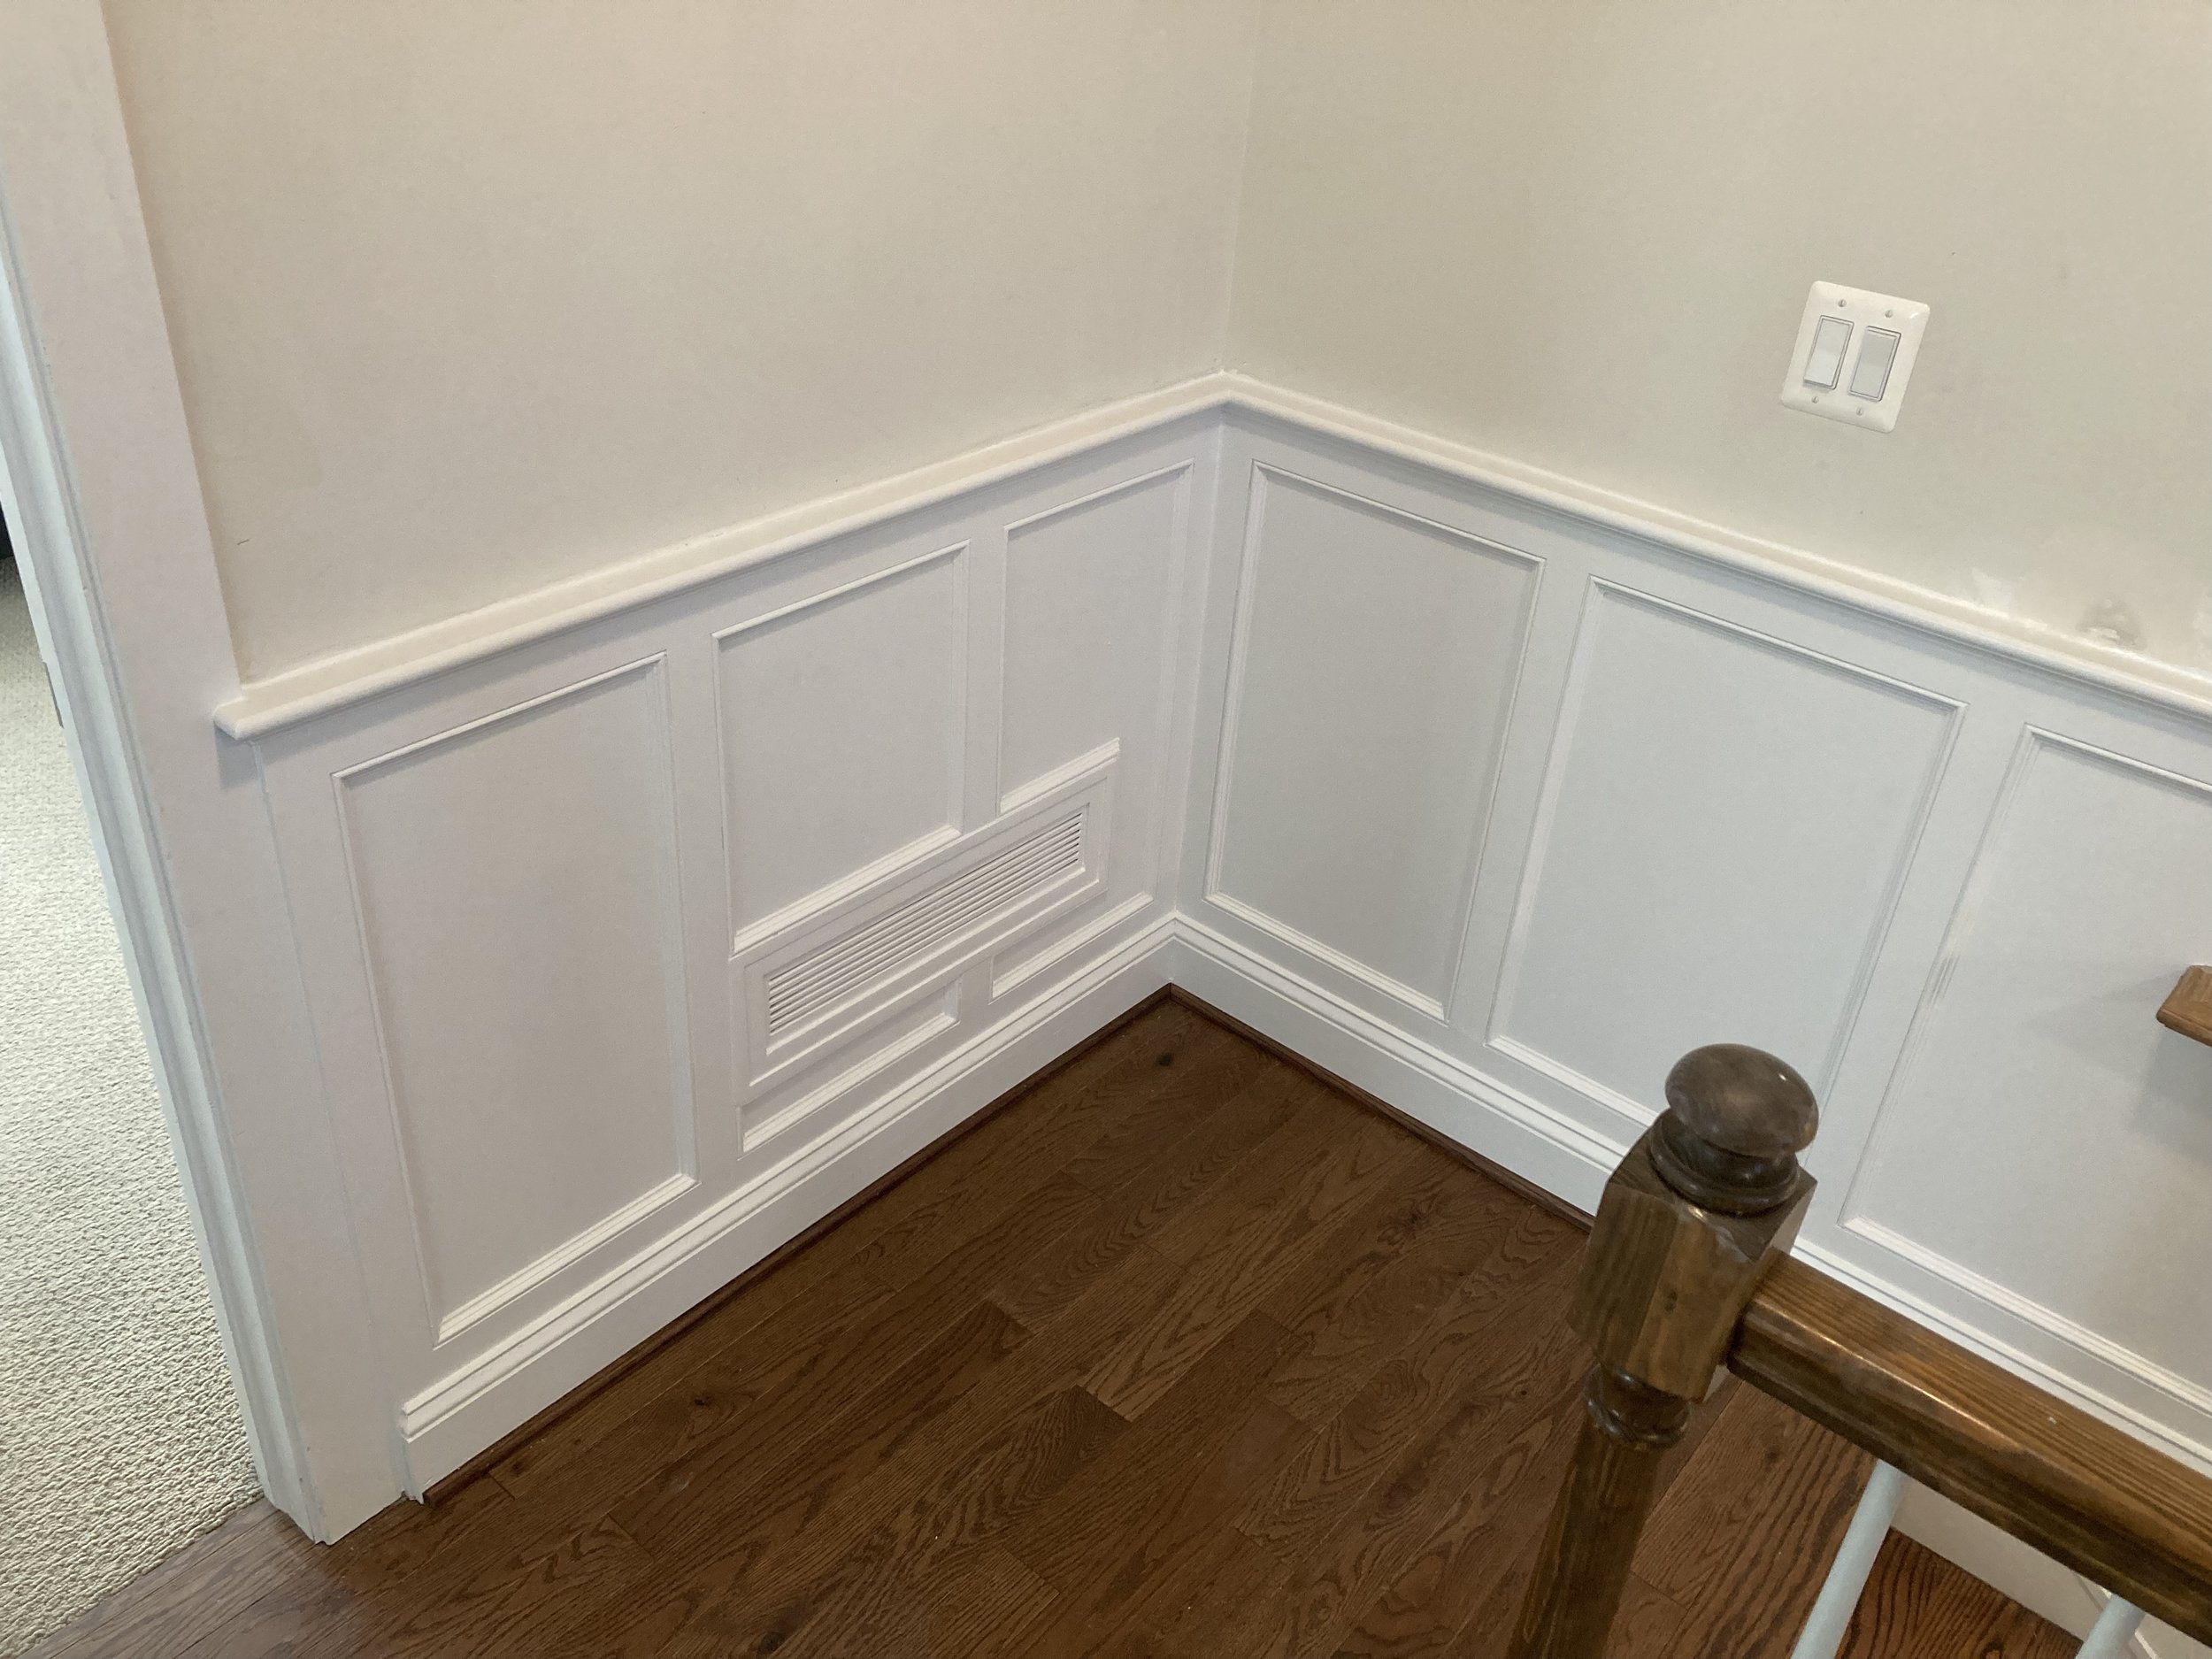
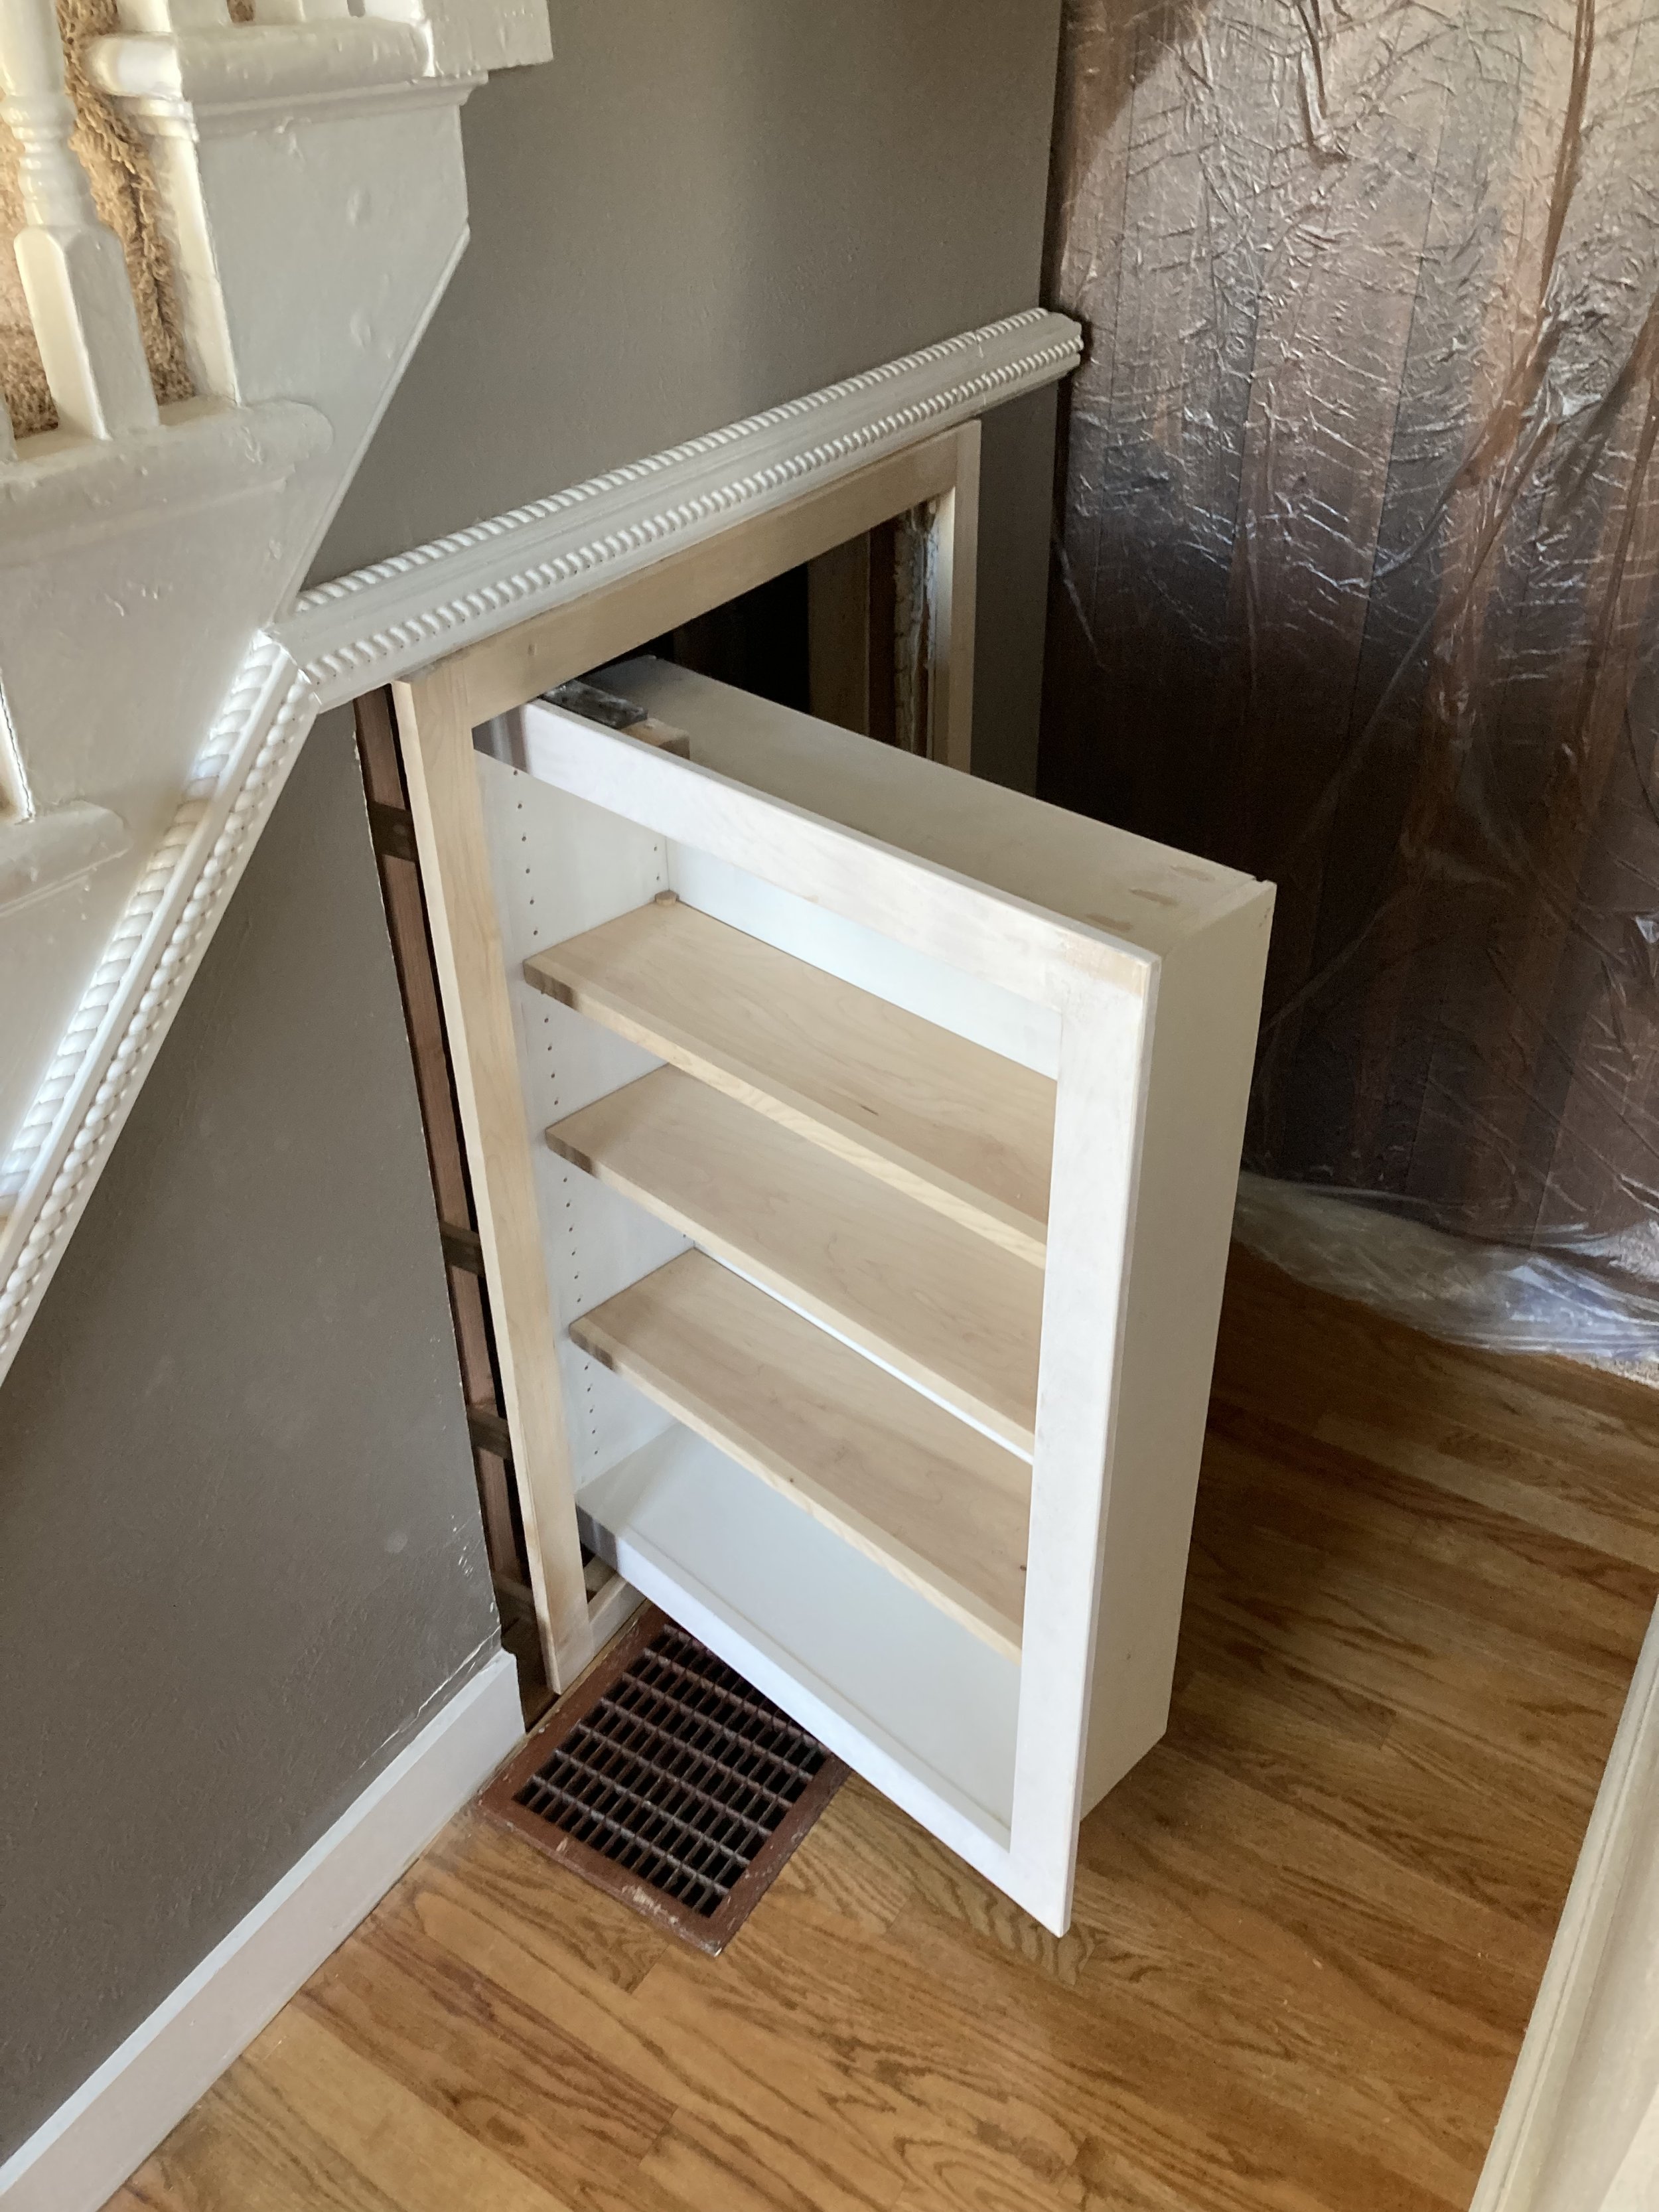
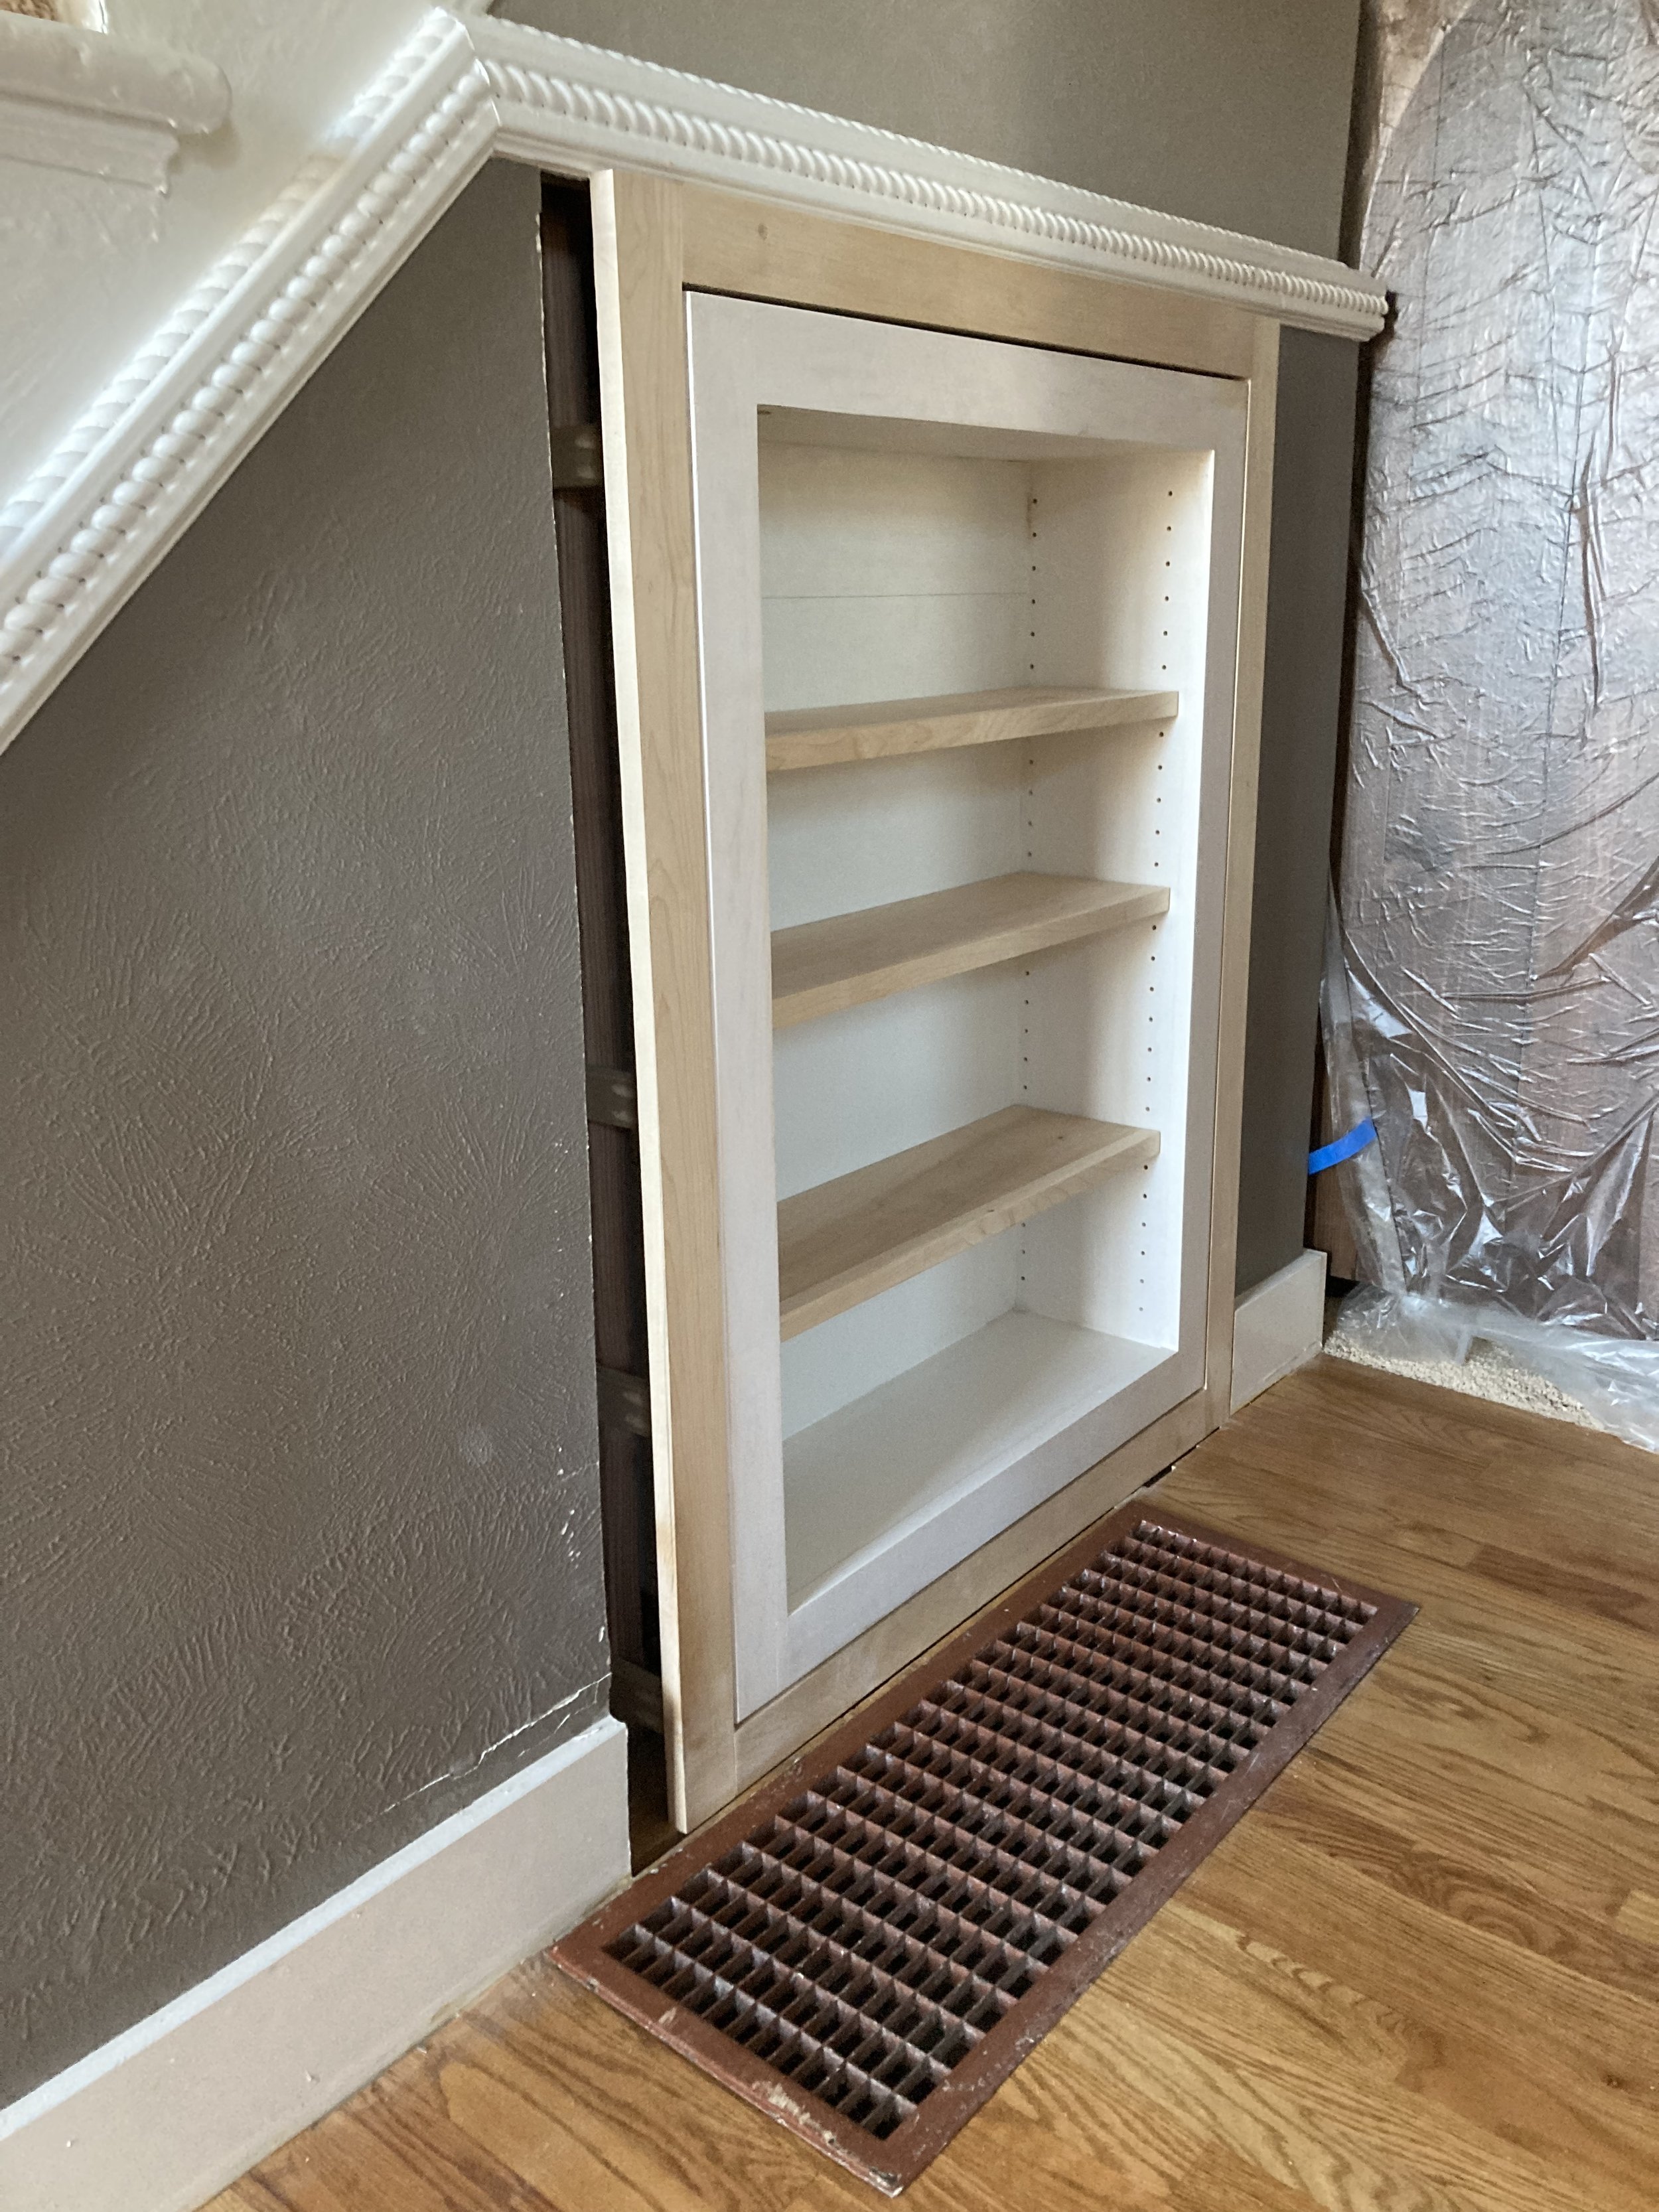
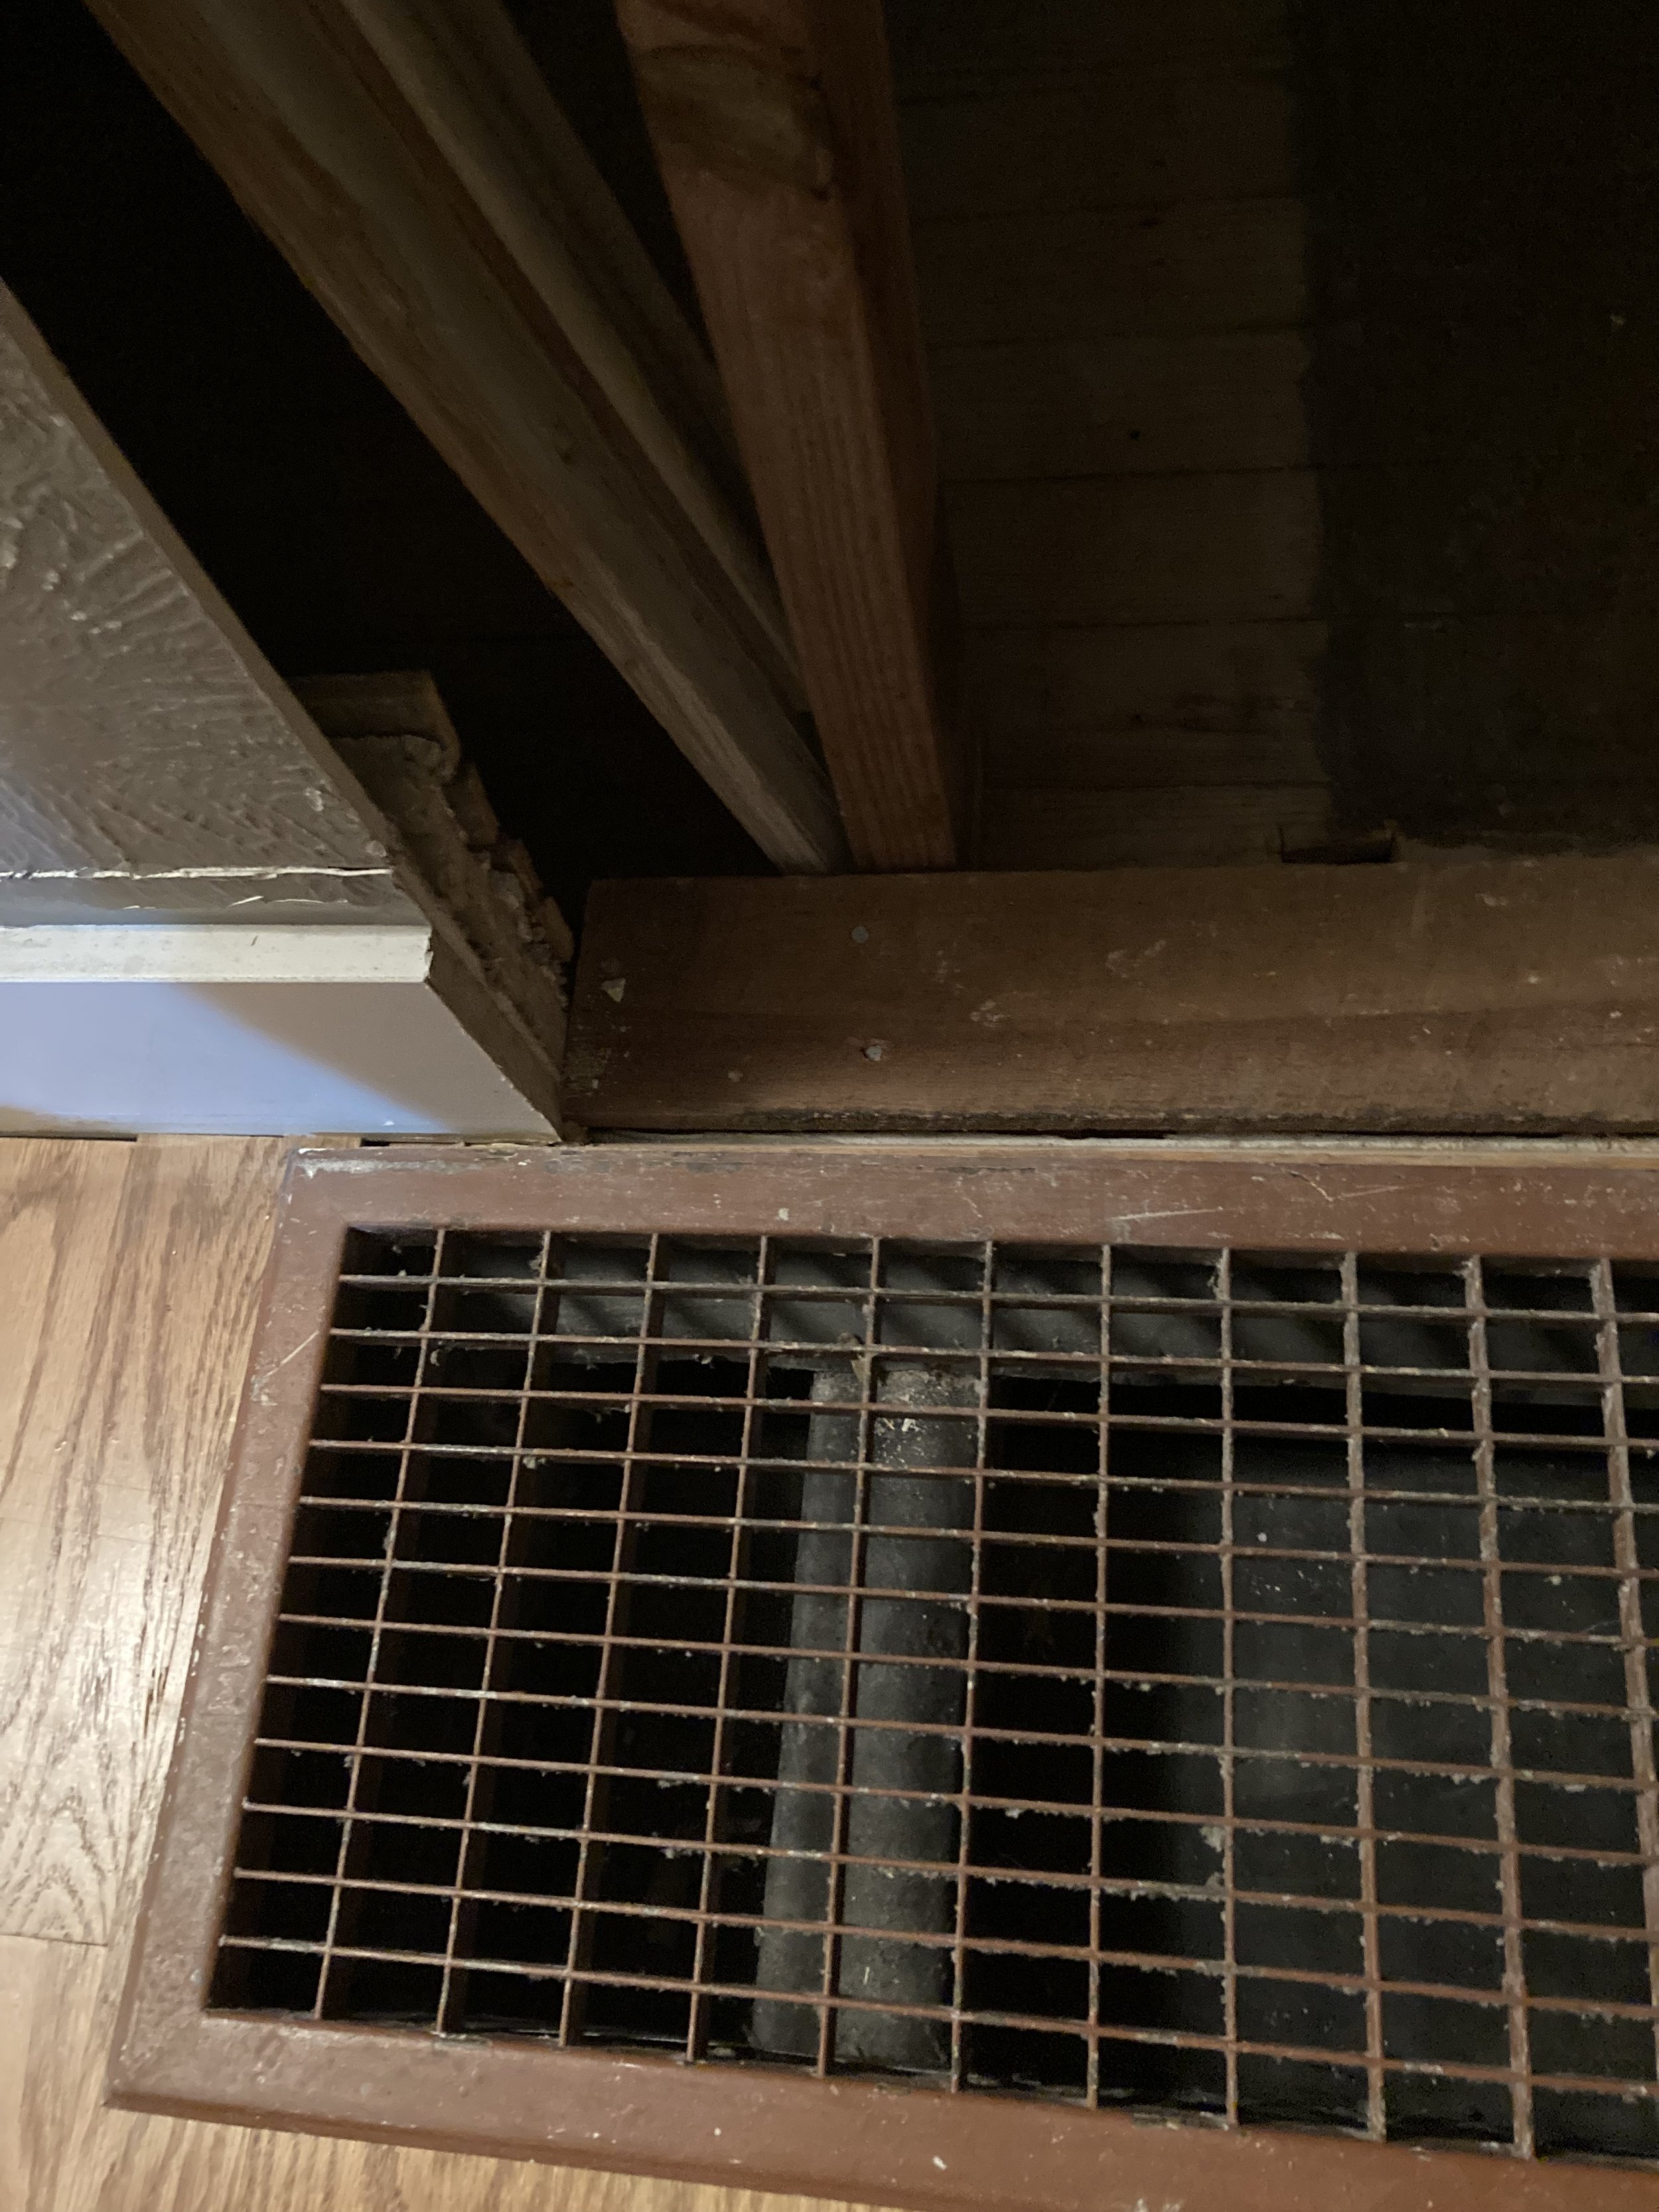
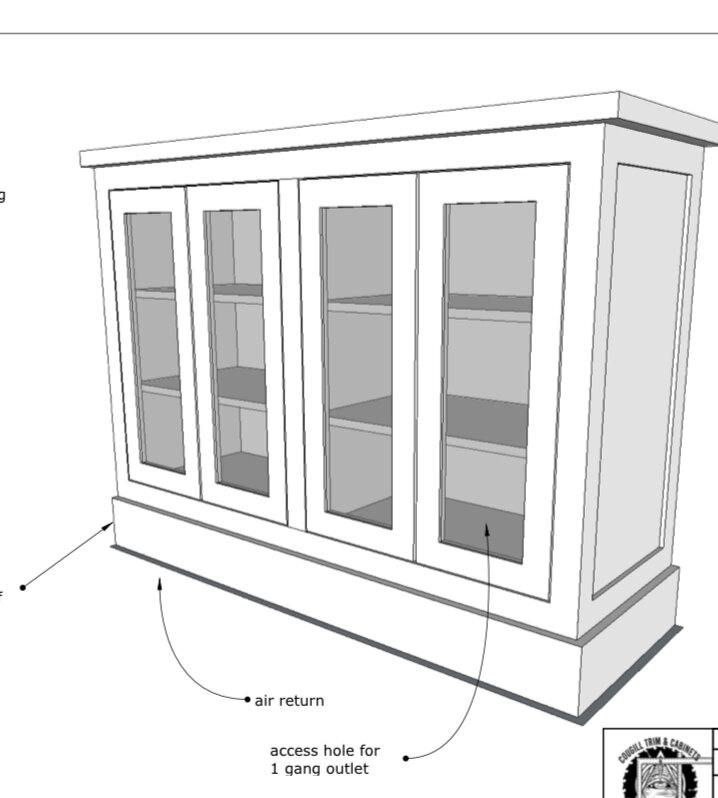
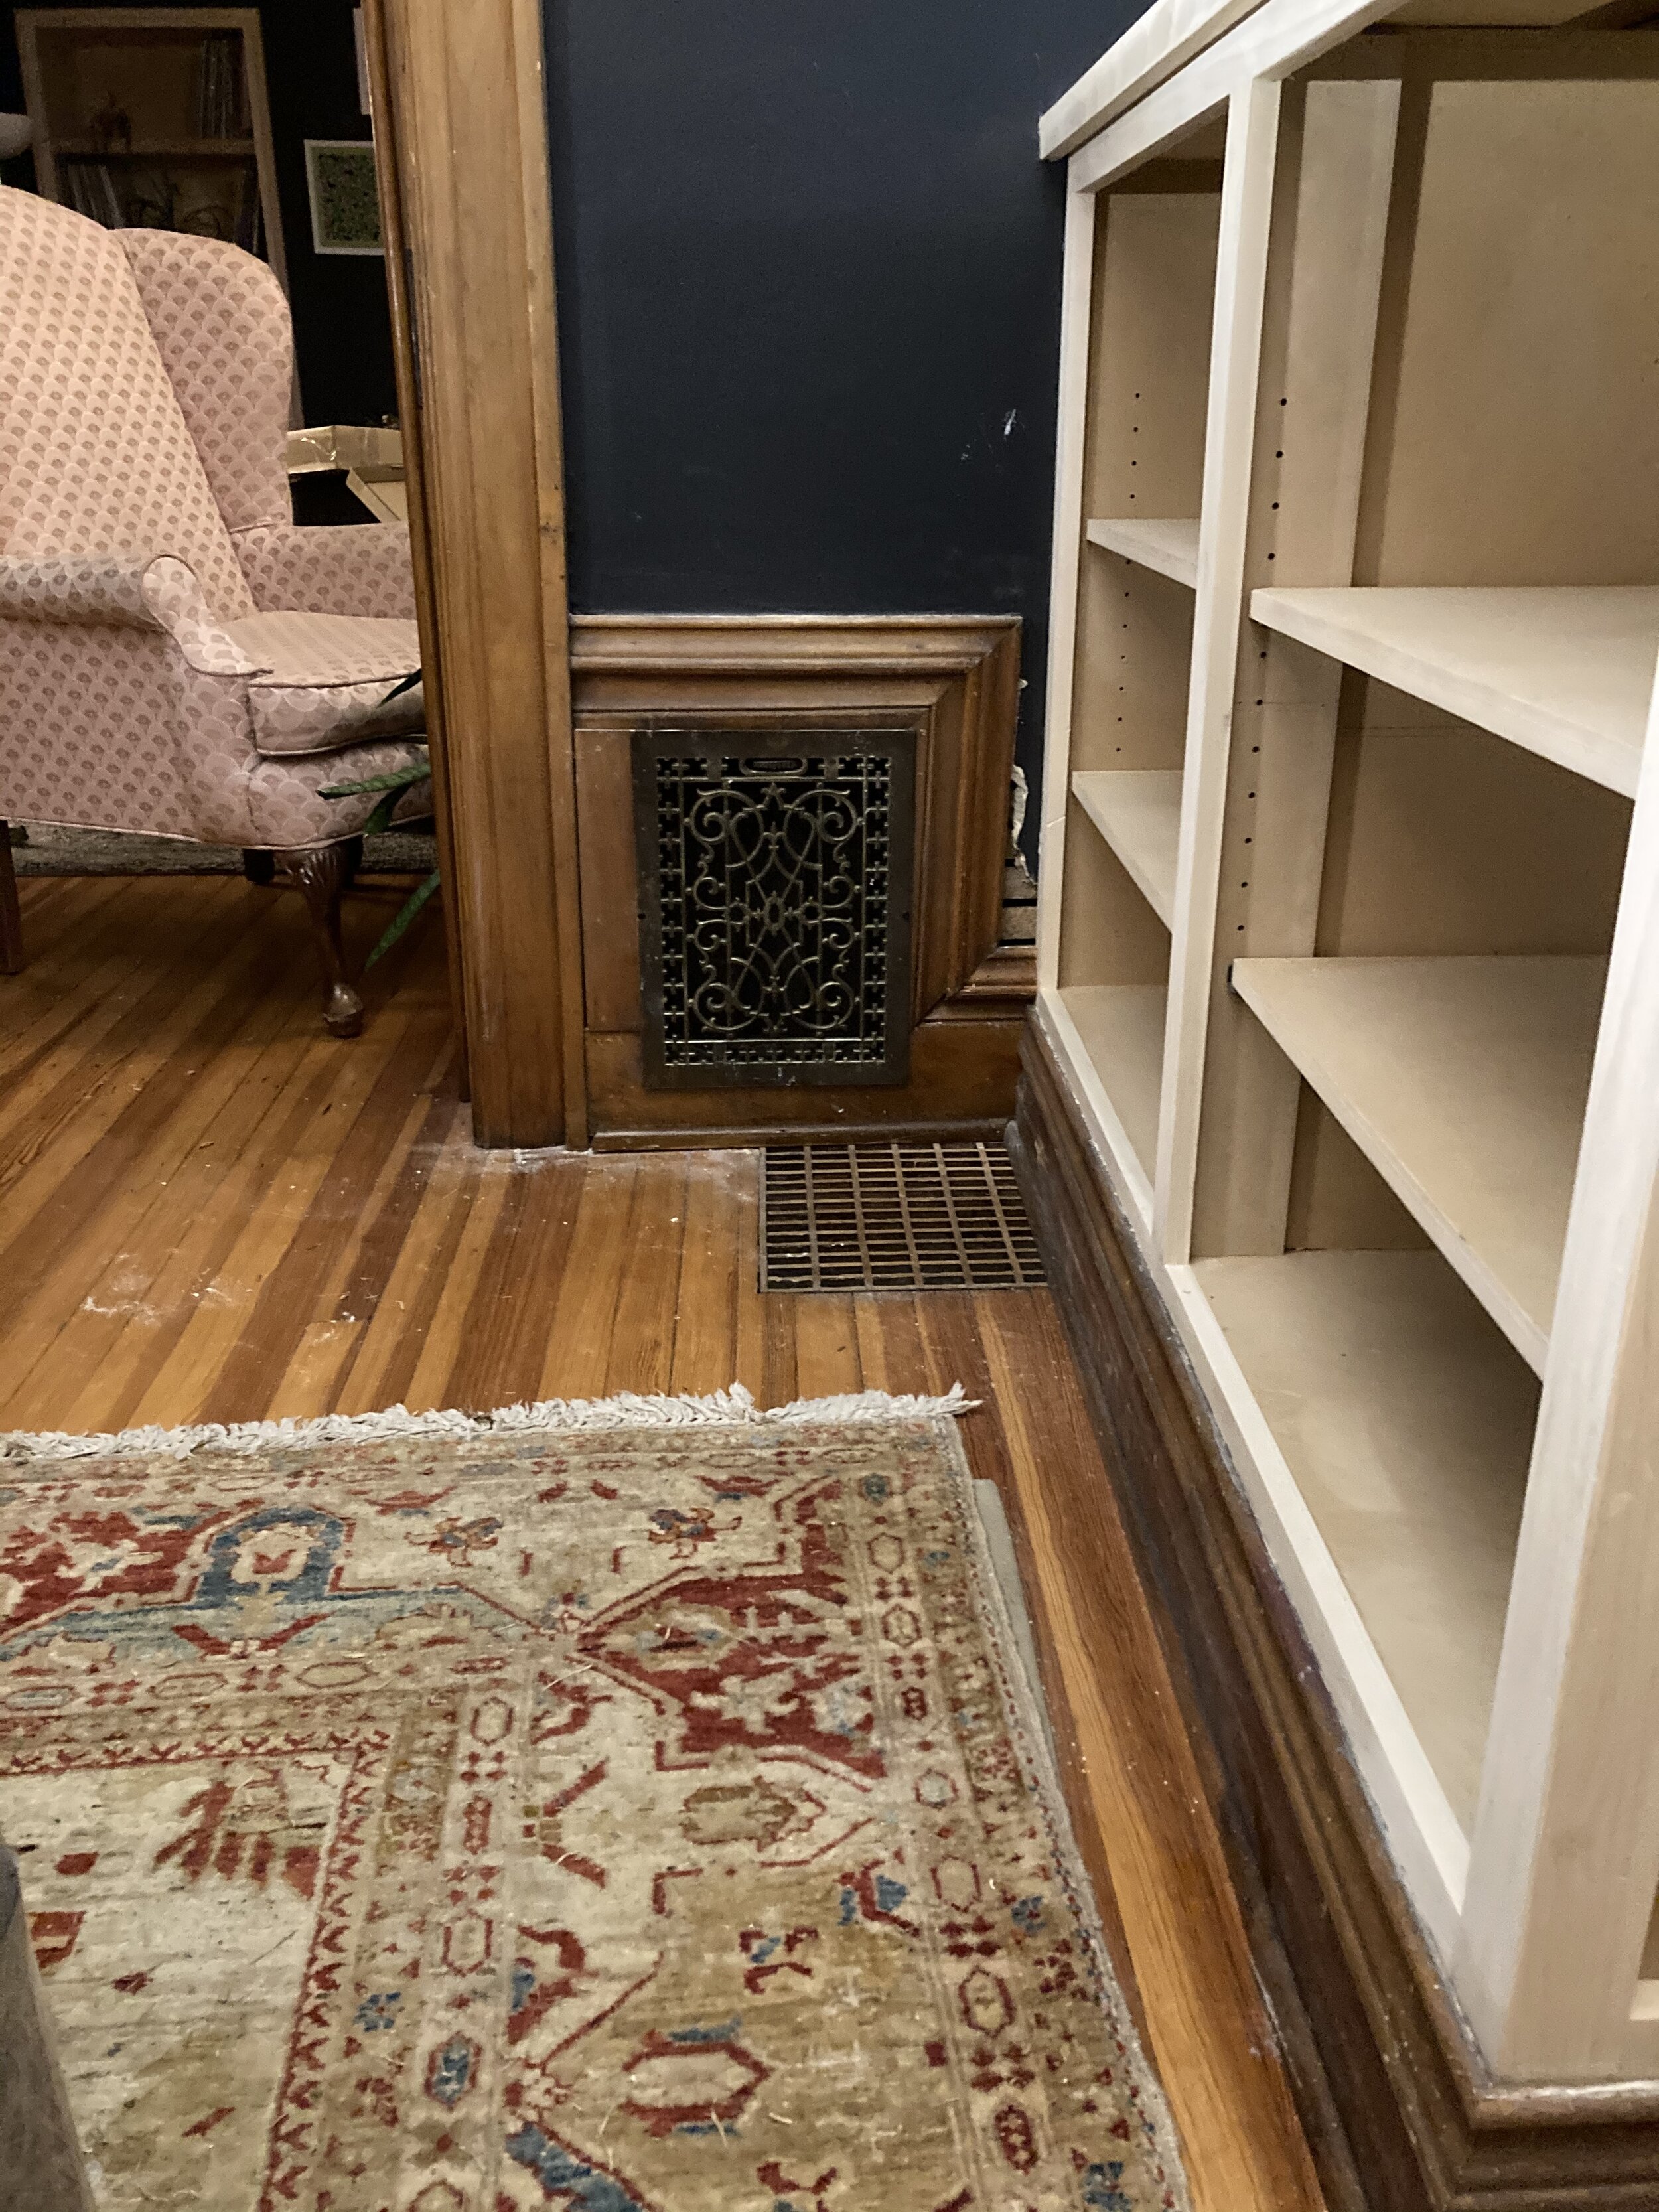
Now, we had a rough opening ready for a bookcase door, but there were still some obstacles. The clients wanted an out-swing door to maximize the already limited space inside the closet, and the door needed to clear a floor grate, the air intake for the furnace. For this reason, we opted for an inset double face-frame design which had a few major advantages:

  • Strength: With the cabinet and its hardware bearing on two 3/4” maple face frames, we virtually eliminated any risk of racking in the front

  • Function: by swinging out 2-1/4” over finished floor, we would miss the air intake entirely.

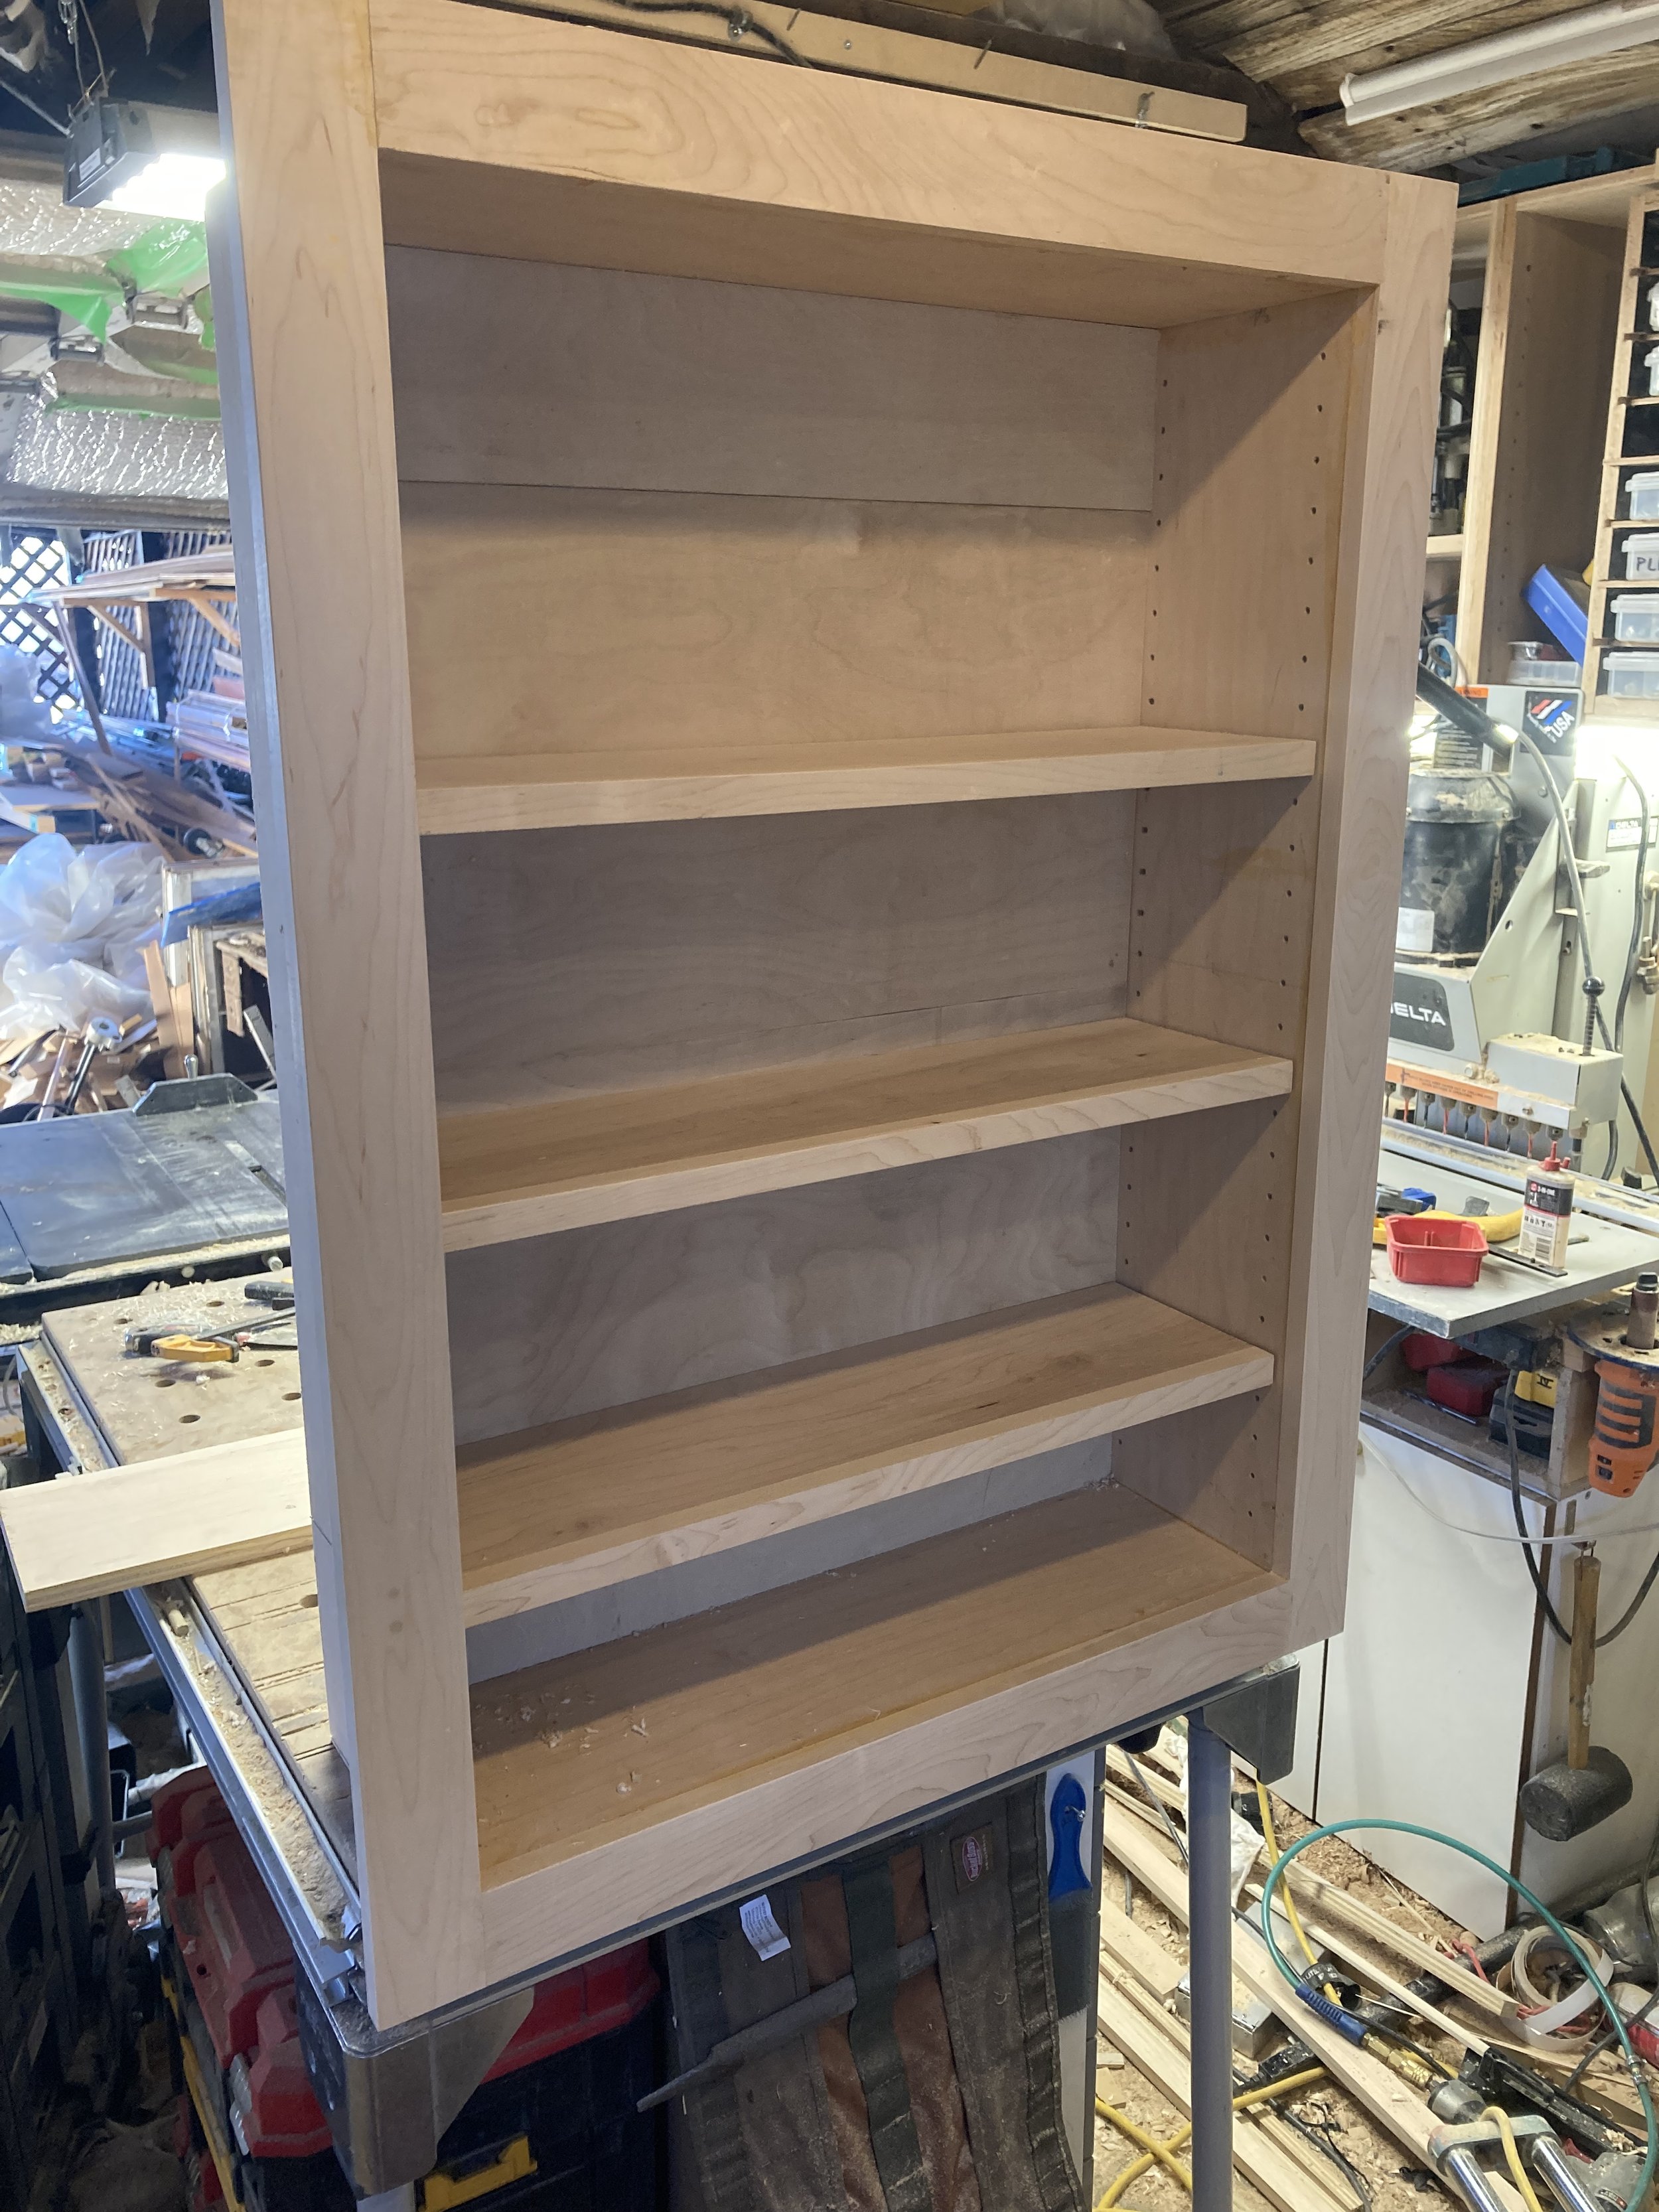
However, this did present a few additional challenges. Most pocket door kits are designed to mount directly to the floor or to hinge off of a 2x4 jamb using something like a Soss hinge. In this scenario, the wall was 3” thicker than the framing due to a prior remodel which added furring strips and drywall over the existing lath, horehair plaster, and original trim. There wasn’t room in the budget to rip it all out and start fresh, so we opted to keep the current wall depth and work around it. The best fix seemed to be adding 2”x2”x8” hardwood blocking to the back of the outer face frame. This created adequate bearing points for two heavy-duty pivot hinges. With this system, we could build the entire unit off-site and test/adjust hardware before enclosing the unit in a wall cavity. Work space in this home was tight already; building everything off-site was highly preferable.

The Finer Points of Bookcase Door Function

Racking

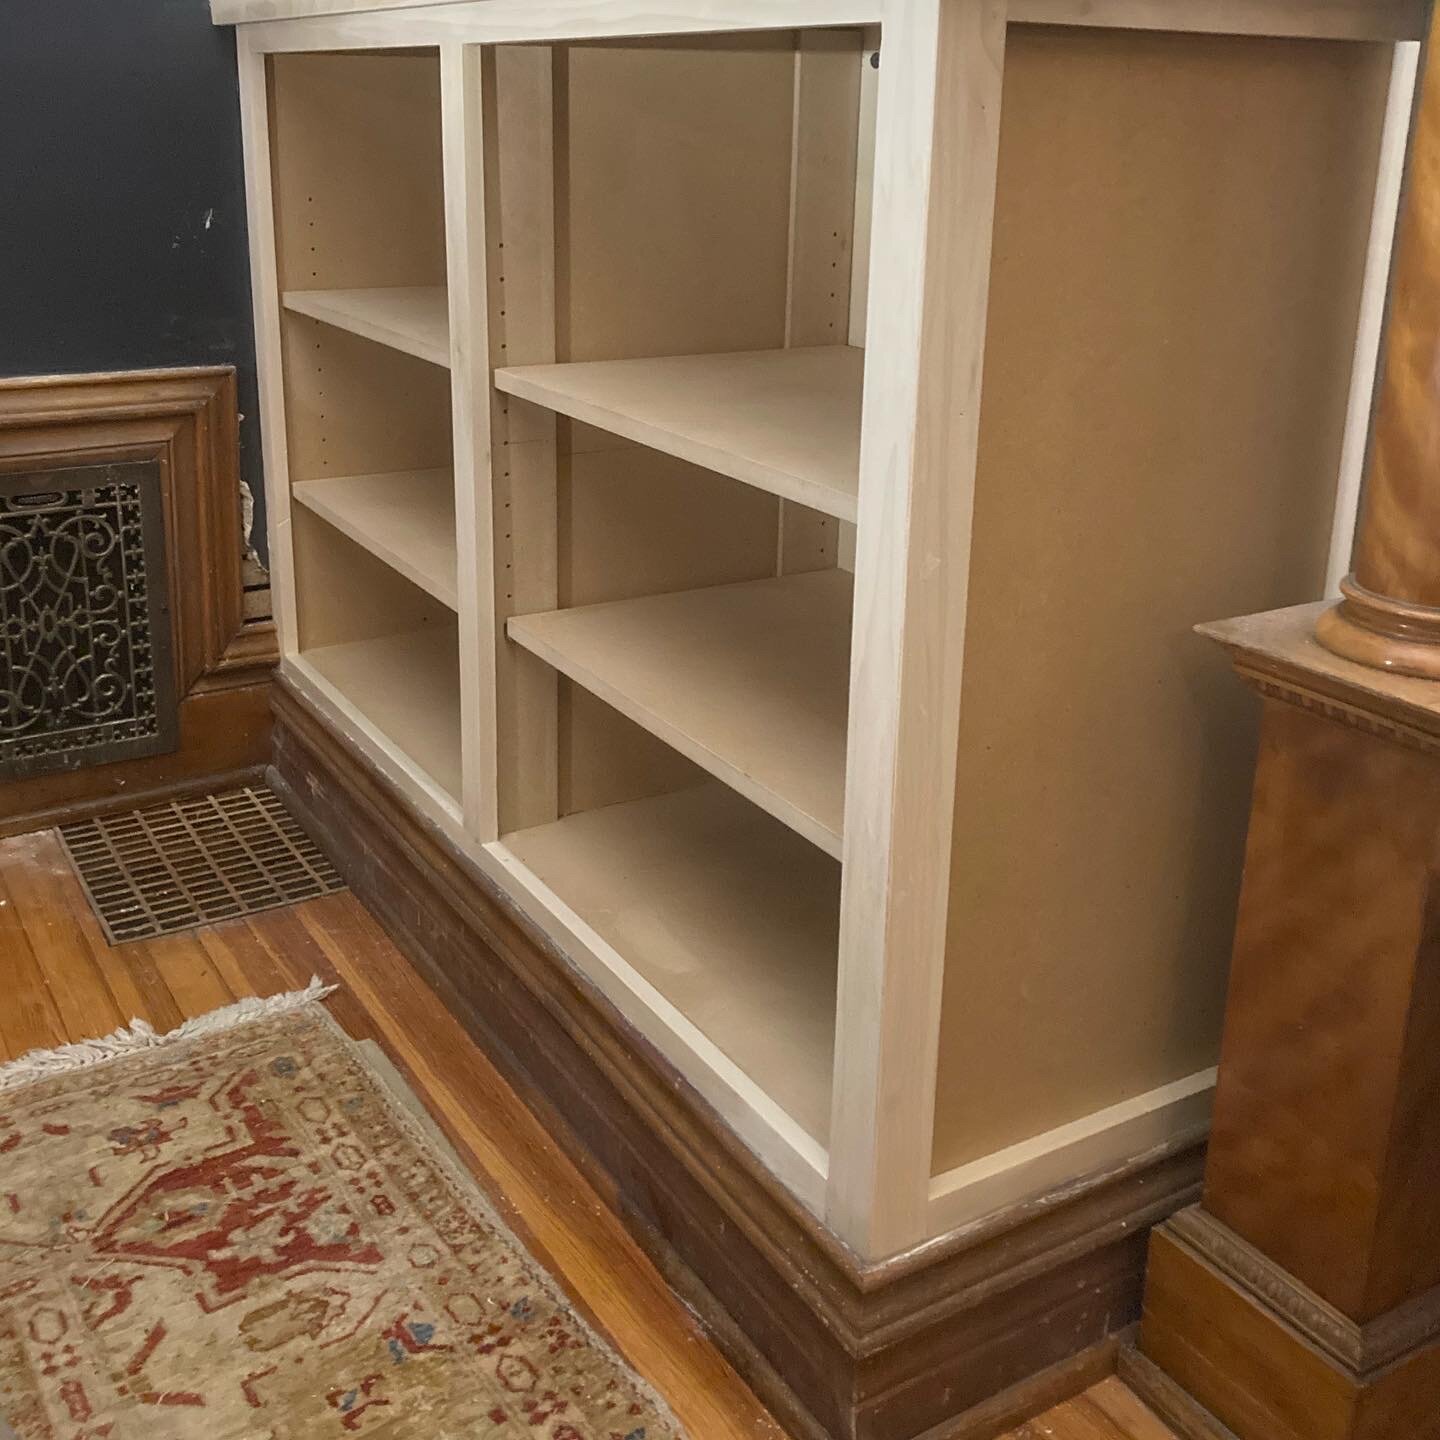
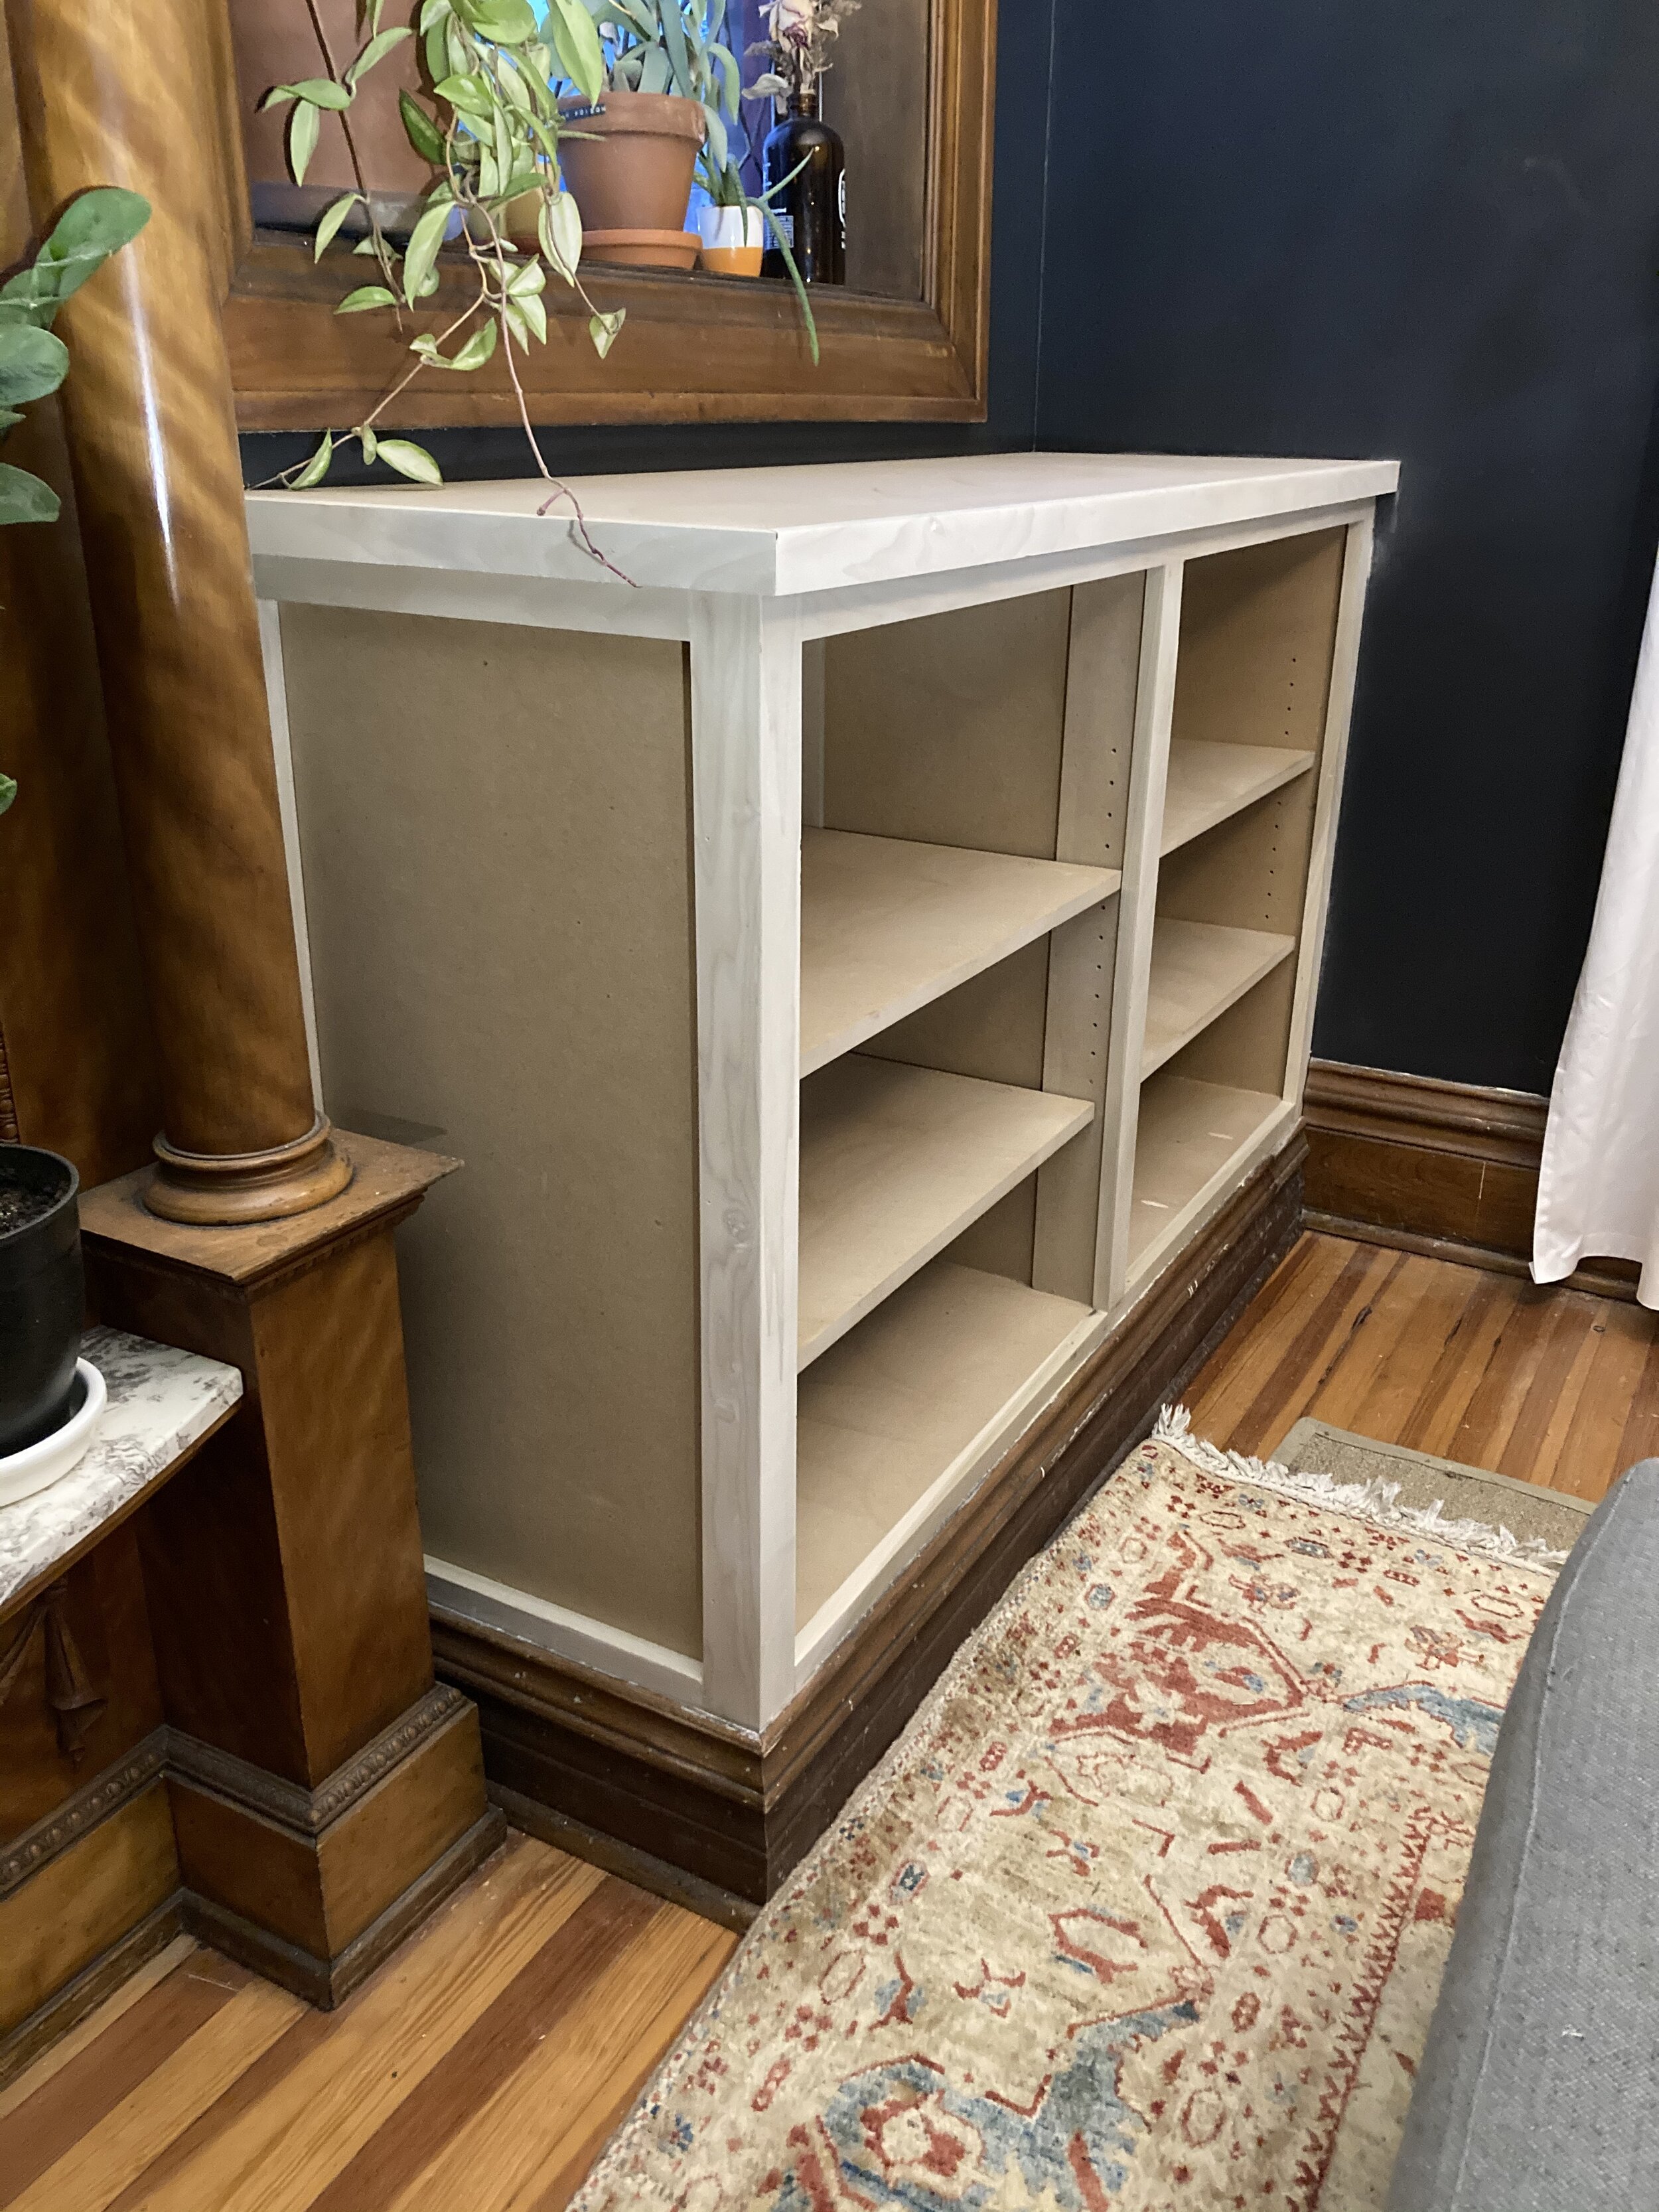
Many bookcase doors have fixed shelves because they provide additional support. This limits what the shelves can store though, so adjustable shelves are a better choice if possible. This does require a bit of planning though to keep the whole unit from sagging. A heavy duty face frame in hardwood glue and screwed ensures that the face of the unit won’t sag and distort over time. The back of the bookcase was rabbeted in, then glued and stapled. This provides additional resistance to racking and binding over time. Finally. the whole shelving unit was built from plywood to keep weight down to a minimum. Because of plywood’s high strength-to-weight ratio, the unit can hold more books without putting undue strain on the supporting structure.

Clearance

A bookcase door is a rectangular prism moving through a rectangle, so there has to be clearance on the strike side (the side opposite the hinges). This presents a few challenges with the design, since you’re hoping to maximize space, any wasted space should be minimized. When we face this same problem with swing doors in standard jambs, we bevel the door, usually about 3 degrees, to clear the jamb when swinging through the jamb. To accomplish this with bookcase doors, we oversize the face frame and undersize the bookcase so that there’s a gap on the strike side. In this case, the bookcase itself is 7-1/4” deep on a 3/4” face frame. That means I need the hypotenuse of the triangle formed by the jamb, carcass side, and pivot point to clear the jamb. I drew all this up in cad and pivoted it to see if it would work, then adjusted as needed. I’ve seen too many of these with awkward modifications to clear jambs and didn’t want to have to deal with that on-site.

Bearing

All of the hinge options out there for this are pushed to their limits swinging an over-loaded bookcase, so by managing the depth and using the heaviest-duty hardware available, you at least have a fighting chance. The obtain the same load rating in a Soss hinge as a pivot hinge, the cost would have doubled, not to mention the added labor of a complicated 2-step mortise required. I like InvisiDoor’s system that can be purchased through Custom Service Hardware.

Trifecta Plant Stand: free woodworking plans

Trying something new. Here’s a free set of plans for one of my woodworking designs. Get it touch if you build it! I’d love to see the outcome and would greatly appreciate the feedback as I’m planning to release many more similar projects in the coming months. I’m also planning to produce limited runs of several smaller household items so stay tuned…Plan Set (dropbox)

Who Used to Live in Your House?

Did you know that there are census records available for most Denver homes that were standing prior to 1940? These can be accessed through the Denver Public Library’s research portal.

  1. Go to the Denver Public Library’s main page

  2. Click on “research” at the top of the menu

  3. Choose “Ancestry Library Edition” database

  4. Log in with your library card number

  5. Start your search!

Click to enlarge.

Click to enlarge.

Here’s an example census from one of our projects. You can trace these individuals through multiple census years too and follow their life changes and such. Couple that with birth, death, marriage, and obituary records and you can start to get a sense for who these people really were. Cool, eh?

A Pair of Bookcases for a 1910's Denver Square

These basic bookshelves are meant to take a backseat to the homes original millwork. Even though they’re pretty simple, nailing the details here completed the look. Here are a few features that make these work:

  • The width of the cabinets was adjusted to match the distance from the wall to the center mirror’s widest trim detail (the base moulding). The cabinets were built so that the face frames were flush the the inside of the cabinet, giving me an overhang on the wall side to fit to the wall. The house’s original base trim just barely fits in between the cabinet and the center mirror’s base plinths.

  • The depth of the cabinets was set by the air return on the wall. It had to clear the trim with some space so it didn’t look crowded.

  • The countertops were designed to just tuck under the window trim with extra overhang that I could fit to the adjacent walls.

  • The face frame is mitered where it wraps around the cabinet so that the reveals would be equal.

  • This pair of cabinets was built to a modest budget, from poplar and MDF.

Check out these finished photos after paint!

Flex moulding: Tips and Tricks

Radius millwork used to be a much more difficult proposition than it is now. It involved gluing up large pieces of hardwood in thin strips, layer by layer, around a form. The wood “springs back” slightly, so you have to build the form at a slightly tighter radius to account for it, and then that piece of wood has to be profiled. It’s an awesome product when it’s done well, but it’s extremely expensive and time consuming.

Today, we usually use a product called Flex Moulding, a urethane rubber trim product that’s cast in 10’ sections and installed like a piece of wooden trip. It sounds great, and it is in some ways, but it’s challenging to work with for a few reasons:

  • It’s heavy! a 10’ section of a large-ish crown moulding weighs about 60 pounds. Now, imagine holding that over your head to fit it into position and nail in off.

  • It’s a little unruly. Imagine now that that piece of moulding isn’t just a 60 pound dead load, but it moves more like a python. It’s floppy, droopy, and has “memory” meaning it wants to return to the position in which it was shipped. It ships coiled in a roll and stuffed in a box, so it constantly wants to curl.

  • Temperature completely changes its working properties. It’s a urethane rubber, so when it’s cold it’s as hard as any hardwood. When it’s hot, it’s like a giant eraser. At room temperature it’s pliable, but difficult to maneuver.

  • It’s not wood, so a wood glue doesn’t work very well.

  • When it’s cut, the “dust” looks like a prop shop’s idea of shredded parmesan. It’s not biodegradable. It’s statically charged so it sticks to everything.

  • It’s expensive. Like really expensive.

  • When flex crown is pushed into place, it likes to roll up longitudinally and become slightly concave. It’s not noticeable until you try joining a seam. The joints like to gap at top or bottom 1-3 degrees.

When you’re working with this unruly stuff, there are a few tricks that I’ve found make it easier:

  1. Add blocking before you begin. It’s heavy, so they added structure is good. Plus, this solves the aforementioned rolling issue.

  2. Stick to stock profiles. If you can’t find your crown in flex off-the-shelf, lead times are crazy and cost doubles. Match your flat trim to your flex, not the other way around, if you must do custom.

  3. When you’re cutting, use a vacuum dust extractor, and add a back-stop of easy mask plastic film. That static charge will grab any dust that the extractor misses.

  4. Don’t use conventional wood glue. Use high-temperature hot glue or hi-pur. Don’t use regular nails to stitch your outside miters together; use 22 ga fine wire upholstery staples ideally, or 18 ga narrow crown staples can work. Set and bondo your crowns. You’ll need that grab. Back you outside miters with hot melt and dowels for added stability. For splices, I tried scarf joints with mixed success. I prefer butt joints with a #20 biscuit. Try to splice over your blocking. You can use pinch dogs to stretch the joint tight, but opt for wider pinch dogs if you have them.

  5. Keep a heat gun around to warm up sections and get them to relax. This especially helps before joining a seam to prevent cracking if the material springs back.

  6. Use crown moulding hooks to set flex crown. Fastcap makes some. Make some better ones from metal flat bar. You’ll need a helper or two to install this stuff.

  7. Add adhesive behind your trim. For flat stock, PL works well. For sprung trim like crown, I had good luck using loctite spray foam adhesive applied after installation through a bore hole that I later fill.

  8. Use Bondo automotive body filler on seams. Use spot and glazing putty on nail holes. It’s virtually inevitable. There will be heavy filling in some areas.

It’s a cool product! Two bonus tips:

  • keep your off-cuts and cut sections of coves, ogees, rounds, etc. and use them as sanding blocks for future projects.

  • For sanding your joints, make a custom sanding block by sticking blue tape to your face profile and adding a big glob of bondo on top with extra hardener. When it’s try, peel it off and stick sandpaper to it. Boom. Countoured sanding block.

Here are some radius crown moulding jobs I’ve worked on:


Handrails over winder treads

Handrails are always a bit of a challenge, but some of the quirks of winder treads in particular can present some challenges. This is especially true when the railing is more angular and contemporary. First, probably best to clarify a few terms in this jargon-heavy subject.

  • Winder treads are a stacked triangular treads used to turn a corner when space is at a premium. They are a method of eliminating a landing while maintaining code-required rise and run distances. The rise and run are measured at the “walk line” on all stairs, but it becomes of particular significance on winder and circular stairs because the spacings are not compliant at all points on the stair.

  • The Walk Line is the line that a person naturally travels while ascending or descending the stair and not trying to be cute about it. That’s 12” from the narrow side of a winder tread all the way up.

  • The rake angle is the pitch of the stair, the angle at which the stairs rise in relation to the horizon. Most stair builders make a pitch block to assist them in laying out handrails, especially challenging ones.

  • A blind tread butts into a wall. It may be a short wall at the rake angle that the balusters attach to, or it may be a full-height wall. An open tread or exposed tread ends in space, so the tread and riser ends are exposed, and in all but the crudest of executions, are capped with a skirt board and nosing returns so that no end grain is exposed.

I was helping a friend and fellow stair builder with a handrail that had winder treads in a challenging configuration. It was a 1-story ascent quarter turn stair with 3 winders, blind on one side, and exposed on the other. This was a remodel railing, and part of the job was converting the stair in two key ways. First, the carpeted treads were converted to false tread ends, meaning that the carpet would look more like a runner down the middle with stained treads ends and painted riser ends. It’s a common look in our region. In this case, the risers are mitered to the skirt board for a nice upgraded luxury look which further complicated matters. Second, it was originally an “over the post” railing, which runs continuously from start to finish using curved fittings. The railing is pegged to newels with dowels on their tops, and generally ends with a turn-out or volute. It’s a more traditional style of formal handrail that was popular when this house was built around the early 2000’s. The client wants this new rail built as a post-to-post handrail where the rail is fitted between newels with decorate caps on top. It’s a popular look currently, and a nod to earlier craftsman-style homes.

This is already looking like a complicated project, before you factor in that the winder section mid-way doesn’t turn at 90, but at 45, in keeping with the tradition of the 90’s-2000’s in Colorado of architects playing with the angle tool in AutoCAD to come across as more edgy. That takes a complicated stair and makes it fairly infuriating because it presents a few more issues:

  • the skirt board is now a compound miter as it carries around that inside corner while also ascending and connecting 3 different rakes.

  • The miter returned risers are connected to that infuriating central piece and all must be mitered at odd angles to the skirt.

  • Add to this the further complication of winder treads being at a steep rake at the extreme ends.

A winder tread is especially tricky because while its rise remains constant, its run goes from really short, to really long to be standard rake at the walk line. That changes the rise and run ratio (the rake angle), which means a winder stair must have a really steep rake on the short side and a really shallow rake on the wide side. If you were to try to add a rail to winder treads open on both sides, imagine how wacky that handrail would look!

Here are a few process photos from the planning stages:

This steep angle isn’t too much of an issue until you start considering that stair fittings (goosenecks, upeasings, etc) are not designed for extreme rakes but for standard rakes, so that may not be an option. Newel cap projections don’t account for intersecting the rail at a steep angle, newel cap spacings that we’re used to seeing are closer to the top of handrail than a steep rake will allow (and still have hand clearance for grip). There should generally be a newel at each direction change, so now you’re mortising a tread around a newel at a funky angle. If you’re using a craftsman-style newel, you need the face mould (where the rail intersects the newel for our purposes here) to meet the newel at the spot everywhere, so good luck figuring that out in advance.

He and I worked it out eventually after much frustration. The end result was worth it I suppose. Will I ever do it again though? Not on your life! Want to see the finished product? Check out his company, Millcrafted Carpentry, on instagram for final photos!

A 1910's Farmhouse Gets a New Stair

This Sunnyside residence originally had the main staircase in the rear of the house. The front stair was a haphazardly-constructed spiral staircase made from framing lumber. The framers made a ton of structural changes with the help of a structural engineering team to move the stair to the front of the house and make it a safe stair for primary egress to the master suite above. We were brought in to install the treads and risers as well as the balustrade.

The stair was framed in such as way that limited our newel mounting options. We made the best of it by starting at the most difficult transition and lining up the balusters with the elevation change which set the spacing for the entire stair.

Mitered Skirting

  • We mitered the skirt board to the riser boards for a sleek, seamless look. Often the risers are exposed showing endgrain which never looks quite right. It takes up more stain than face grain so it’s darker that everything around it, or if painted, never stops looking a bit rough. This is a cleaner method for attaching risers.

all rail sections meet the newels at the same height.

all rail sections meet the newels at the same height.

Elegant Transitions

  • By mitering the handrail up and down the stair, the rail meets the craftsman-style newel at the same height in relation to the trim details on every post, making for a more harmonious aesthetic. This makes the height changes a feature rather than an inconvenience.

Balcony Guard Rail

  • Most star builders butt the handrail between two walls with this style of post, but we managed to cut them in half lengthwise to keep the same look throughout the stair.

half newels continue the look of the rest of the handrail at the balcony

half newels continue the look of the rest of the handrail at the balcony

Hanging an Oversized Barn Door

Any specialty door requires a ton of planning. This one was no exception. at 60” wide, it was beefy. Even in poplar, it weighed well over 100 pounds. When you’re hanging one of these tracks over a finished wall, if you’re lucky there’s a solid header across the whole span. That helps a ton. Spoiler alert: I wasn’t lucky! The drywall was even thicker than usual at 3/4”. But that’s what we do: adapt and overcome. We plane, we saw, we conquer.

What I like to do in these scenarios is drill out a plug of drywall the diameter of the stand-off bracket and make a plug from oak or plywood with a hole saw to replace the drywall. That way, I can really tighten down that lag without crushing the drywall and causing the track to sag. In this case, I didn’t have a header or a standard 16” c-to-c stud layout, so I had to attach a cleat to the wall to back the track. A piece of CVG fir did the job. Oak or maple would have been better but this was adequate.

With that cleat fastened into place top and bottom at every stud, I could put my lags wherever I needed them to fit the pre-drilled track. You’ll notice I had the layout pretty much where I wanted it until the ceiling threw a wrench into things; the ceiling pitch to the gable was too close to the roller at the height I wanted. After dropping it down 1/2”, I still had clearance at the floor, clearance up top, and I got lucky really is what it amounts to. Otherwise, it would have meant lugging the track saw upstairs and trimming it down. I wanted to avoid that since the door was prefinished on 6 sides and I’d have to prime the cut to keep the door stable over time with changes in moisture.

I was using a roller guide for the bottom mounted to the wall, so I needed some vertical clearance, 3/8” or so. A T-guide mounted to the floor could have worked too, but means drilling into the travertine tile and I try to avoid that in case they want to change door styles in the future. For the closet I built inside this space, I glued cleats to the floor to support the bulkheads rather than drilling for the same reason. If it’s going to see a ton of wear and tear like a kid’s bunk bed set, that’s different, but this was appropriate for this use case.

All in all, I’d call it a success. This roller system worked beautifully. If I were to change anything about the setup, I would have opted for a lower profile roller so I could center the track above the door opening, and I’d have put a header in before drywall to carry the weight of the track, then added an oak cleat the thickness of the drywall. That way, the track would sit as flush to the wall as possible without ever having a chance to sag. When you use us for pre-construction services, these are the kind of trade tips we plan for your project so that the execution of these types of final details is perfect, but we can make it work at any stage in the construction process with some ingenuity.

Mudroom Benches: A Standard Design With Options

Our mudroom bench design

Our mudroom bench design

It seems in most newer homes and remodels, one upgrade that many people are looking for is storage for their entryway of some sort, like a mudroom or a simple bench with open storage below for shoes. We designed a basic mudroom bench system that is on-trend for the Denver market. This design has several advantages:

  • It is modular; add the features you want or expand later on

  • It’s economical, using materials that are high quality, but competitively priced

  • It’s available in stock sizes, 12” intervals at a competitive price since we can manufacture the parts in bulk, or order it in custom widths for a 25% up-charge

  • We can install the bench or provide it as a kit for you or your carpenter to assemble and install.

  • We can paint it or install it unfinished for your painter to finish.

Looking for mudroom storage that looks great, functions well, and fits your home’s aesthetic? Made in Denver? At a price that won’t break the bank? Look no further.

A Simple Look Requires Complex Planning: part 1

Sleek, simple, plain designs take planning to execute perfectly. Take this example of a window seat we’re designing for a customer’s remodel. All of the details have to be correct to achieve that simple, elegant style.

If we’re calling something a seat, it has to be comfortable. 15” is generally a comfortable height, but I’ll go lower sometimes for children’s rooms for instance or if the client is particularly vertically-challenged. If there’s a cushion planned to sit on top, I generally allow 3” for the cushion and 50-70% compression of the foam or batting. Any adjacent shelving should clear that height, 3” cushion, so that the cushion doesn’t slide to left or right.

For a window seat, we must consider the window as well. A comfortable bench has an angled backrest, generally 5-7 degree slant. Where this intersects the window trim is important. To achieve a nice transition, I usually incorporate the backrest into the window stool. Note: a window sill is exterior and slopes away from the house. A window stool is flat/level and is interior. The stool is bordered by an apron below, and the casing rests upon the stool to left and right.

The baseboard height is also crucial. Built-ins where the carpenter does not account for the baseboard height look clumsy and can cause functional issues with door function for overlay doors. If there’s something that looks “off” about a built-in design, it’s often that the baseboard height wasn’t accounted for before laying out the stile and rail panels / doors.

The ceiling height also must be accommodated for a full-height unit. There must be space for the projection of the cornice, ample spacing for an entablature, and a graceful transition between adjacent columns, or in this case, cabinets. The proportions should be intentional and arranged in a manner that fits with the scale of other mouldings in the room. I rarely do bookshelves on top of seats or hutches taller than 60” or so, for a number of reasons, but largely to keep things in proportion. When I want to design a taller unit, I’ll add a secondary cabinet on top divided from the lower shelving unit by a picture rail which continues around the room.

Finally, the bench part of the bench seat should be rather substantial because it’s acting as a supporting pediment for the adjacent “columns” and I want to carry that sight-line all the way across. If interrupted, it again looks unbalanced.

In terms of features, all of my shelves are adjustable for maximum flexibility. Bench seat doors should be inset into the face frame, but often in new-construction I see finish carpenters cut the seat out of a solid panel. That means that the front of the lid will be too short by the thickness of the kerf of the saw minus the thickness of the hardware used. It can work with cabinet hinges adjusted properly, but it does not work with piano hinges (not that it stops them from trying). On a related note, only a barbarian would use piano hinges in MDF. Terrible idea.